Basement Project – Insulation

In the past basement insulation was often overlooked. Typically basement walls were cinder blocks and that was it. Now there are so many options from a construction standpoint, you really need to do your homework to see what suits your home building situation. Layer on top of that all the options there are for insulating your basement, and you’ve got your work cut out for you.

Insulating your basement goes a long way to reducing your energy bills, and increasing the comfort of the occupants living inside the home. Even if your basement is a storage catch-all, or a place to sequester unruly family members, there is great value in making your basement warm through the use of insulation.

The main advantage basements have, compared to the rest of the house, is it’s surrounded by soil. And the deeper you go, the more the temperature of the soil levels off around 50-60 degrees. Even at 4′, the temperature starts to hold its own verses air temperature above.

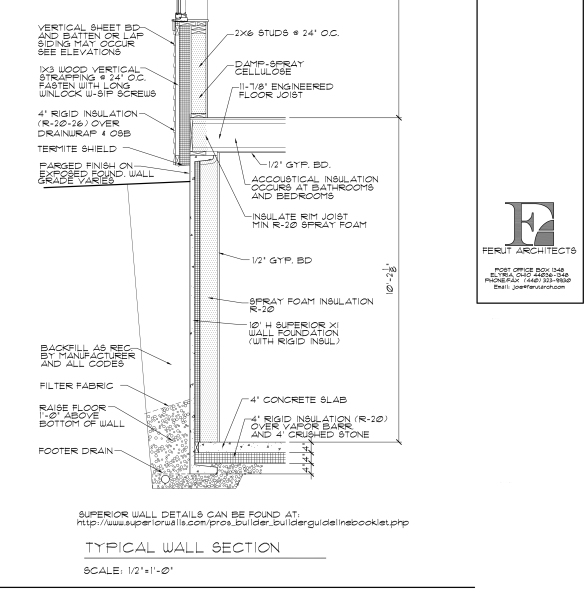
Here is a cross-section of our basement, provided by the wonderful peeps at Ferut Architecture:

Basement wall section courtesy of Ferut Architects. copyright 2014

Basement wall section courtesy of Ferut Architects. copyright 2014

So, taking a look at the diagram, you can see our awesome Superior walls make up our foundation. They’re awesome because they are prefabricated cement and include R-15 of rigid insulation right from the factory. Check out  this post to see how they were installed. It was amazing.

The plan was to add 3″ of sprayed 2 pound insulation to the inside of the Superior walls; adding R-20 to our R-15 walls for a phenomenal R-35 insulation rating to our basement walls. Also note we already have R-20 (4″ of rigid) under the cement floor. The basement would be warm snuggly nest once we were done.

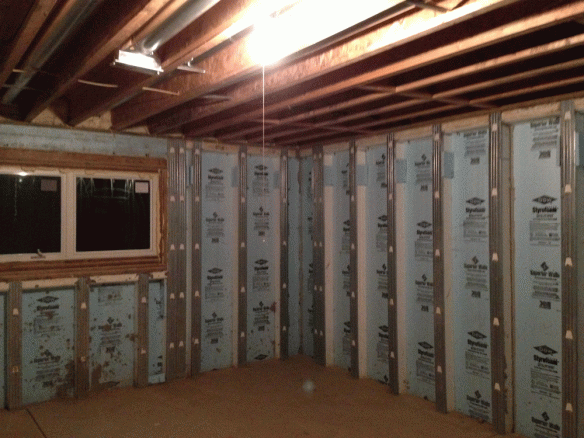
Basement before insulation.

Basement before insulation.

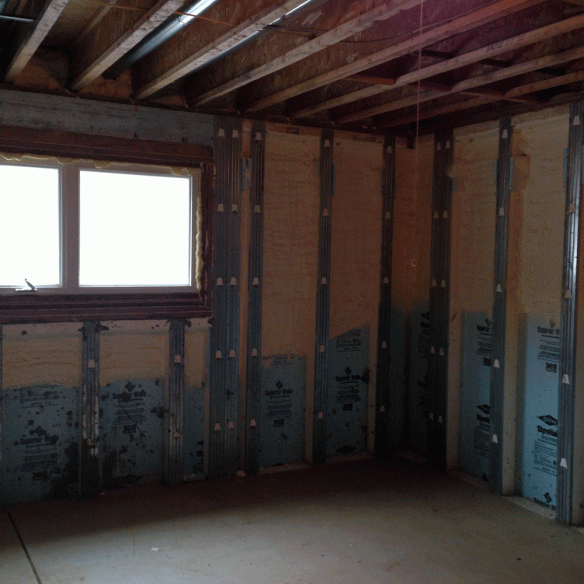
Well turns out due to cost restraints we needed to dial it back a bit. What we did was in all of the areas that were getting drywalled, we had our friends at R-Tek Insulation in sunny Barberton, Ohio, spray 1.5 inches of insulation on just the top 4′ of the 10′ walls. This gives that area an added R-10 of insulation, for a total of R-25. This is better than most foundations, and worlds apart from traditional uninsulated cinder block walls.

The spray foam provides an air tight and presumably water tight, or at least water-resistant seal on the walls. Once the drywall is on, our basement should prove to be more air tight. The combination of air tightness and increased insulation should lower our HERS rating from its current level at 41. I’m not sure if I’ll get the house tested again. Maybe down the road after I do a few other things (to be determined).

By the way, spray insulation must be covered with sheet rock (drywall) as I do think there are fire concerns with the material when it’s simply exposed. We limited our spray only to those areas where there would be drywall. The storage rooms did not get any additional insulation at this time.

For reference on a scale from 0-150 the average home has a HERS rating of 130. New homes have to have a 100 rating. A zero energy house (which we hope to be someday) is 0. Our house is about 59% more efficient than your typical new house.

The cost for our additional insulation was $2,000. To do the entire top to bottom at R-20 would have likely been $8,000 or more.

Basement after insulation.

Basement after insulation.

The white colored spray foam expands as it dries. It also creates a air tight, water tight barrier.

The white colored spray foam expands as it dries. It also creates a air tight, water tight barrier.

The top 4' are insulated with 1.5" of 2lb. spray insulation (R-10).

The top 4′ are insulated with 1.5″ of 2lb. spray insulation (R-10).

Another option instead of spray insulation would be adding more polystyrene rigid insulation. Check out the Superior website here, for more information. You simply cut and install the rigid, bonding it to the existing rigid in the walls using liquid nails or other non-foam attacking adhesive. In fact this is what I will do for the storage rooms where we won’t have drywall. Because the spray insulation needs to be covered, per code, putting rigid in the storage rooms is my only option really. So strangely enough we will likely get a full R-20 floor to ceiling in the storage rooms because I just have to pay for material. It’s a super simple DIY job that I can do myself – free labor! Actually in hind sight, I should have likely done this everywhere from the get go, but I already had the insulation guys lined up. No worries, I like the spray insulation. And down the road if we really want to I’m sure we can go back in to the exterior walls and spray more (would have to replace drywall though).

One other note, I don’t think you ever want spray paper based insulation in your basement. With all the potential natural moisture issues, like the potential for flooding, in a basement, paper based insulation (like we have upstairs) is a bad idea.

There you have it. Now onto finishing framing and building some storage shelves.

Let me know if you have any questions or comments below.

Framing The Basement – Steel Studs

Here’s my recap for framing the basement. It’s probably a good thing I’m writing this a few weeks after the actual work, because it wasn’t as easy a chore as I would have thought.

In a previous life I rough framed houses, so framing is probably what I’m best at when it comes to home DIY projects. Had I chose to use wood framing I’m sure partitioning the basement would have been uneventful. Well because of my concerns with flooding down there, should the sump pump ever fail, I was leery to use pine 2×4’s that could become water-logged and moldy in a water event. There’d be the risk that I’d have to rip everything out and start over if that ever happened.

I could use all pressure treated lumber, which would be impervious to rot, but I was thinking of a more contemporary solution.

Steel Framing

I knew about steel framing, having seen it used at my corporate job. It seemed like that might be a good option: use galvanized steel framing. If it got wet it wouldn’t rot, mold or rust. So I did my homework.

From what I gathered steel framing would be less expensive and go up as quickly as lumber. You can’t use it for structural walls, but none of my basement walls are structural. They just have to hold up drywall. Steel framing is also resistant to fire, which is a good thing around mechanical systems. And steel is 100% recyclable, so it’s a good choice from an environmental standpoint.

I got a quote for having someone else install the walls, but I decided to try to save some money, as well as learn a new skill by doing it myself. Here is an article from The Family Handyman magazine that explains how to install the steel studs (click here). I’ll let you look and learn on your own. Instead of going through the steps again, I’ll hit on my thoughts and highlights regarding using steel framing (compared to wood framing).

Cost

From what I read steel was supposed to be cheaper but I’m not sure that’s the case. If anything it’s a wash. Studs were $4.17 for 10′ lengths. Pressure treated wood is more. Regular pine / fir is less. I looked at both Lowe’s and Home Depot and both stores had steel in stock for similar prices. I bought at Lowe’s because I get a discount there.

Fastener wise you have to buy screws, four per stud. That cost is likely the same as nails so that’s a wash. The same goes for the floor anchor bolts.

Advantage: it’s a draw

Material

Steel is great because it’s straight and light weight. I did the entire project single-handedly. I’m not sure I could have done wood alone. Also we haul materials on the roof rack of the RAV4. Lightweight steel means more studs per trip to Lowe’s. Wood is renewable. Steel is recyclable, fire resistant and doesn’t rust*.

Advantage: steel*

(*make sure you get galvanized steel. I bought mine at Lowe’s and I’m almost certain it’s not galvanized, other than one batch of studs. I asked the associates on two occasions and they said the product I was buying was galvanized but I’m pretty sure it’s not. What I got will likely rust over time potentially. I’ll keep an eye on it (I have access to nearly all the walls from  the back side via mechanical rooms).)

Installation

Wood is easy. Measure and cut. Steel studs are a pain in the ass to cut to length. Our ceilings are 9′ tall. Turns out the holes for electrical wires to go through the stud fall right at 9′ from the end of our 10′ studs. So I had to cut each stud two times.

Actual installation was nothing short of maddening. A drill holster is an absolute necessity since you have to screw each stud four times, twice each top and bottom into metal channels. You also have to clamp the stud to the track every time you go to fasten a screw. I nearly had the entire basement framed before I learned that you just gotta jam the drill on full blast and hope the screw bites.

The worst part is trying to fasten a screw where the track butts up against an obstacle such as the I-beam running down the center of the basement. I finally figured out you need to install the fastener from the inside of the stud, not the outside, first. Then do the subsequent other fastener on the other side of the stud, from the outside.

Steel stud install easily took 2-3 times longer than wood would have.

Advantage: wood

Utility

Steel studs can’t bear weight. So if you’re going to hand cabinets or shelves you likely have to frame those areas with wood. Doorways need to be trimmed in wood anyway because finish trim won’t attached to steel unless you use decorative small profile head screws. I plan on putting in a barn door for the storage room and I know I’ll have to block the heck out of that area to support a sliding door.

For electrical, my electrician is saying steel will cost more because of the boxes and whatnot that he’ll have to use. Also I’ll need to block in with wood mounting points for outlets and more.

Steel is great for partitions but not much else. By the way, all my soffits are made from wood, as well as the ceiling in the bathroom.

Advantage: wood

Final Verdict

So it’s no surprise that I can’t recommend steel framing for any project. I love the look, and steel is definitely easier if you’re working all by yourself, like I invariably am. I suppose the learning curve is there: I now know what to look for and I’ve made many of the mistakes. But regardless I probably should have just stuck with lumber, even if I used pressure treated sole plates and risked wet wall studs.

Check out my photos below for more info and details.

Shoot me any questions in the comments section.


Basement Planning and Pricing

Before we jump into all the “fun” work I’ve been doing in the basement for the last six weeks, let’s do a post to go over our game plan.

Budget is the biggest driver for the project. We have zero money frankly, but as I said in the last post: we feel strongly that we need the space to be useful, otherwise what’s the point. Before the project the basement was full, no exaggeration, of “stuff”. Furniture, half filled boxes, years worth of stuff that had just been moved from house to house. For example, in our old house we had a library filled with books. There’s nothing like that in the new house, so there are just box after box of books. My wife collects board games and we’ve never once had a place to store and display her very extensive collection. I have every car magazine from 1986 to the early 2000’s. Yes, those can be recycled but I’d like to go through them first. Point is we have more crap than most of you combined.

The basement has to stop being a big catch-all.

Okay, back to design and our plans. Here are the main project areas. I’ll go over them in detail in subsequent posts.

Exterior Walls

When we built the house, you may recall we used Superior Walls for our foundation. The basement walls are prefabricated out of cement and steel, and stand nine feet tall (9′). The walls feature metal stud facings so we can apply drywall directly to the face of them. No need to fir out the walls which saves a lot of time and money. I just need to frame in a few of the corners with drywall nailers. Note, we would also have to frame in for any shelf or cabinet supports ahead of time. Superior walls cannot support a vertical load so don’t go screwing in cabinets into the studs. More info, and to see nailer diagrams, click here.

Insulation

The foundation walls are insulated to R12.5 from that factory with blue rigid insulation. When we installed them I speculated that we would insulate them with another R-20 worth of insulation, which I think is the maximum if we fill the rest of each cavity with sprayed insulation. Well to keep costs down we did two things 1) only insulated the top 4′ of the exterior walls and 2) went to a depth of 1.5″ (R-10). Why? The top half of the wall has the most exposure to outside temperature changes. Once you get beyond 4-5 feet the earth’s temperature is pretty stagnate, something like a constant 50 degrees or something (I’ll let you look it up). By the way, cost to insulate the top 4′ with 1.5″ of 2 lb. spray insulation (R-10): $2,164. Three inches (R-20) would have been $4,040.

Floors

The floors in the basement are cement (over 4″ of rigid foam insulation by the way). Our basement is prone to flooding if the sump pump ever fails, so that drives many of the design decisions we’ve made in regards to our basement project. Long term our plan would be to cover the entire 950 sq. ft. of living space with ceramic or porcelain tile. Short term though we’ll leave it cement. I’ll rent a floor cleaner from Home Depot and clean the cement myself. Not sure if I’ll seal it at this point. I’ll decide when the time comes. We could stain the floor like we did in my studio. That is always an option, in lieu of putting tile down. For now though regular concrete will suffice everywhere, though the bathroom will likely get tile right out of the gate. Cost should just be a few hundred dollars for cleaning and any tile.

Ceiling

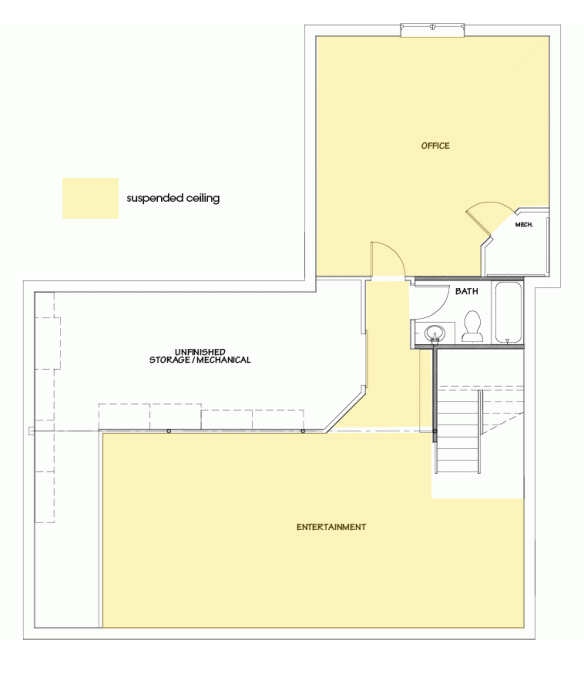
There is some debate whether to put in a drywall ceiling or suspended ceiling. Drywall is cleaner and more finished. Suspended ceilings give you access to HVAC, water and electrical. If you think about it, the other floors of the house are covered in drywall with no utility access. So I think drywall is a fine choice. The problem with our ceiling is there are a lot of pipes, ducts and other obstacles that I don’t want to, or can’t, soffit around. We’ll be putting a drop ceiling in all the living areas except the bathroom. Armstrong has a wide selection of ceiling tiles and a lot of inspiration shots on their website. I got a quote for installing a generic Armstrong system: $3,500. I’ll do it myself. Hopefully the material cost will be closer to $1,000-$2,000. We may hold off and do this next year if we can’t afford it.

The yellow areas will likely be drop ceiling.

The yellow areas will likely be drop ceiling.

Interior Wall Framing

Because of the potential for water flooding should the sump pump fail, I was hesitant to use wood framing. If the basement flooded there’s potential for mold to grow in water-logged studs and walls. Regardless always put down pressure treated sole plates, but I didn’t feel like using treated studs. I was curious about metal framing so that’s what I went with. I still used wood for soffits, blocking and ceiling areas. Look for my thoughts on metal framing in a future post. Cost wise we got an estimate for $1,791 to have someone else do the framing. I did it myself, learned a new skill and spent about $750 on materials to partition the basement. By the way, this includes material for desperately needed storage shelves in the storage room.

Electrical

I don’t do electrical so we’ll have to hire a pro. We’re doing the bare minimum. With the drop ceiling and good access from the storage room we can add-on later. For now it’s all switches, outlets, and ceiling cans. I’d like to swing for 4″ cans but may just default to 6″ to save money. Would like to populate them all with LED bulbs though. Cost estimate for electrical parts and labor is at $4,000. Yikes!

Walls

We’ll drywall everything. I may put 12″ of cement board at the bottom of every wall because of the aforementioned water damage potential. Or not. Estimate we got was $3,757. Doing it myself will hopefully save some money. But I don’t have the patience or craftsmanship (or desire) to mud it all so I may have to source that.

$4K electric, $2K insulation, $1K framing, $3K drywall = $10K, then do the ceiling next year or down the road maybe. We’ll see. I just hand over receipts and the wife keeps track and cuts checks.

Stay tuned for future posts on each step of the way. As of this writing I’m wrapping up framing and the insulation is done.

-Chris


Our Fall 2014 Project

Things have been quiet indoors this year. Most of the activity around the ranch has centered around the bees, and maintenance type chores. Inside we’ve been going about our business of living in the house. But, as I mentioned in previous posts, we’ve got an indoor project going on this fall.

With kids, cats and us all bouncing into each other, the house is nothing short of a disaster on a daily basis. Tripping over toys and debris is a daily sore point for me. As is trying to get a semblance of privacy to work my home based business without interruption. Finally enough was enough. With all the studios, bedrooms, and whatever rooms basically decorated, or at least decorated as much as they will be anytime soon, there is one last major frontier to tackle inside: the basement.

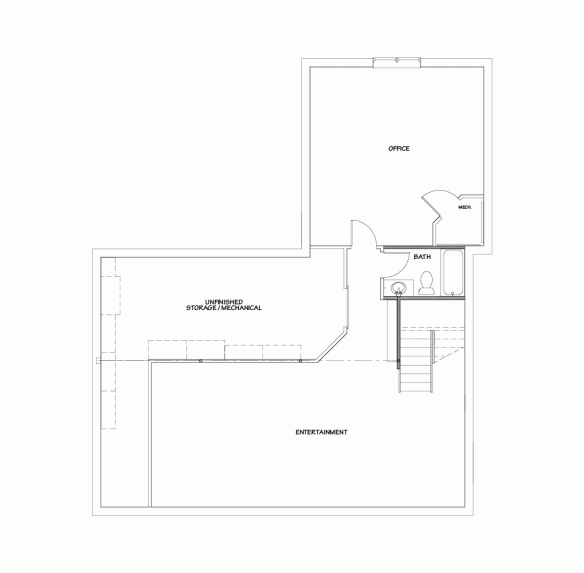
I drew up a floor plan on the computer in October and secured a permit from our local building department. Once completed to plan, the finished space will add 950 square feet of living space to the house. The added usable space will feature an office area for me. Working in my studio just is proving to be a bit too disruptive during the course of the day. I’m not 100% sure I’ll move downstairs but it does provide that option. The other major space will be an open entertainment area which is our primary reason for doing the project now. We need a place where we can dump the children and their toys. A cluttered family room upstairs grates on my nerves. I’m tired of stepping over stuff.

Connecting the two spaces is a hallway and bathroom. The bathroom is already roughed in and the shower is already there. A large portion of the basement will be partitioned off to be a storage room as well.

We did not want to wait to finish the basement. If we waited, I know what would happen: there would never be a good time. We’d never have the money. The kids would be in college and then why bother. So keeping costs down is paramount. This will be our first finished basement since we’ve been a family.

Our budget for the project is $10,000. We don’t really have a due date but hope to be mostly done by Christmas this year.

Basement plan

Basement plan

I am (will be) doing most of the work myself, single-handedly. The intent is to save as much money as possible, so I’ll do everything I can do myself. Hopefully limiting costs to materials or those tasks I just cannot, or choose not to do such as electrical work (which I can’t do).

The plan is to get the basement done to the point where kids can go down there and play. We’ll have a finished bathroom and painted drywall on the walls. The ceiling will be a suspended ceiling and that should be in place. Floor-wise we’ll stick with the cement, but I’ll rent a cleaner and give it a good washing before the project is done.

Stay tuned for future posts as I walk you through the project, sharing what I learned, what works and what doesn’t work.

What projects are you working on this fall and winter?

Have you finished your basement?

Anything you’d do differently?

Share in the comments below.
 

Winterizing Our Bees

We had two temperate November days this week. Taking advantage of temperatures in the 60’s yesterday we prepared all three hives for wintertime.

We checked the yellow jacket traps; emptying and replacing the soda inside as necessary.

All three honey bee hives were a flurry of activity, especially hive No. 3 which had a cloud of bees out front by time we were done. Thankfully hive No. 1 had a lot of bees coming and going from its entrance.

Winter Prep

  1. Locate as much honey towards the center of the upper deep box (second box from the bottom). I actually did this the last time I checked the hives a few weeks ago.
  2. Put an entrance reducer in place for each hive. Once again, did this a couple of weeks ago to combat yellow jackets
  3. Removed the sugar-water feeders from the top of the hives. They were all still fairly full so the bees seemingly stopped taking sugar-water, which is normal. Also removed the empty mid-sized super that shrouded the feeders
  4. Installed a new form of insulation on all three hives. You may recall last year I made a shroud out of rigid insulation for the hive, which worked well but was labor intensive. It also fell apart when I took it off, so assembling it may have been a challenge. This year we got pre-made insulation “blankets” that wrap around the hive. They’re basically heavy-duty black plastic, garbage bag like material, with insulation inside. I slid one over each hive. The hives are set up in this order: deep, deep, medium super, top board. I stapled the insulating blanket just below the top board (inner cover), which leaves enough space for the bees to enter and exit in the front, down low. Take a look at the photos below for a better idea of what’s going on. I used staples, but push pins would work too (I just didn’t have any handy). The insulation should be reusable year to year. It’s a new product so we’ll test it out and see how it goes.
  5. On top of each inner cover we placed nearly a full bag of sugar. The sugar will absorb moisture in the hive all winter and crystallize. Theoretically it will provide a source of nourishment as well, though I’m not sure if that’s right. The wife got this tip from a fellow apiarist at the grocery store of all places. We’ll see. I’m not sure what harm it could cause, so why not.
  6. I placed two plastic shims on top of the inner cover and then installed the outer (telescoping?) cover. This gives the roof of each hive a little angle to shed water. You may not recall but I inserted a strip of 1/2″ wood along the one side of each outer cover to make them “air tight” when the wasps were attacking. Normally the cover has some play left to right which allows insects (and mice!) to get into the hive up top. By leaving that strip in it’ll make a tight seal up top and hopefully allow the hive to retain more heat during the winter as well as keep pests out.
  7. Lastly, I will put some rigid insulation on top of the outer cover to keep heat from escaping. I use the pink stuff I have left over from last year’s insulating shroud.
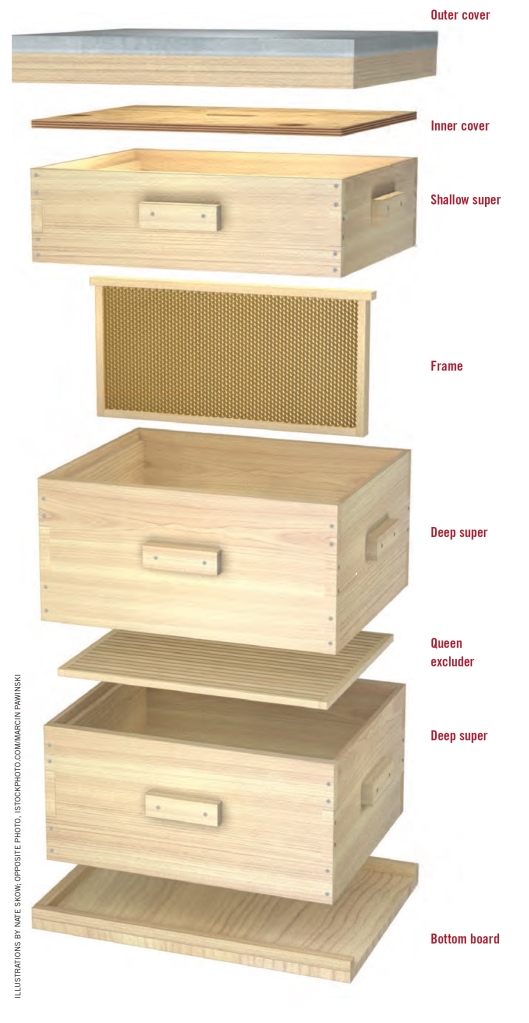
illustrations by nate skow via http://keepingbackyardbees.com/build-beehive/

illustrations by nate skow via http://keepingbackyardbees.com/build-beehive/ We don’t use a queen excluder, but everything else if pretty much how our hive is set up for winter. The bottom deep is virtually empty in some of the hives. All the action happens in the upper deep.


So everything is looking good on the bee front. Hive No. 1 is doing well, just have to see if they have enough honey. Hive No. 2 has plenty of honey hopefully, if there’s any left over then we will harvest that in the spring. Hive No. 3 should be have enough honey, but I doubt enough that we’d harvest next year.

There’s nothing else to do bee-wise now ’til spring. Stay tuned for some posts on an indoor project I’m working on right now. Until then, keep warm.

Hive No. 1

With much apprehension I opened up hive No. 1 yesterday to see if there was anything left. Much to my surprise the bees were doing as well as could be expected. I saw a few hundred bees working diligently to repair the damage caused by the yellow jackets.

I saw hive No. 1’s queen as well.

There weren’t as many yellow jackets as there had been before, outside the hive. Inside the hive I didn’t see any. The entrance reducer, and closing up the other entrances, had allowed the remaining honey bee forces to shore up their defenses. With just one small opening they could then take the fight directly to the yellow jackets on, one at a time. I witnessed at least one or two being escorted from the entrance to meet their demise. I encouraged two honey bees to back off and personally killed one yellow jacket myself with a stick.

It felt good.

I moved all the honey I could find towards the center of the hive. The bees were busy relocating honey as well and repairing damaged comb, as best I could tell.

The wasp traps were doing their job finally. Each had yellow jackets inside. The traps, from Lowe’s, feature two chambers. The upper is filled with soda, the lower has some sort of scented pad. All the scented pad does is attract honey bees, so I have to help any trapped ones get out before they die.

The upper soda filled chamber is working well to kill flies and yellow jackets. Pepsi seems to work better than Sprite.

Hives No. 2 and No. 3 seem to be doing well, with little or no yellow jacket activity.

Hive No. 2 should be okay for the winter. As should No. 3, though it appears to be lagging the powerhouse that is No. 2.

Hive No. 1 could survive, but no way to know for sure.  The last couple days of warm weather have been a boon. And we’re feeding as much sugar-water as we can to the weakened hive. Eventually we will take the empty deep off the bottom to make the hive more compact, and reserve the pollen laden frames for spring. The bottom deep is empty so no need to keep it on stand over winter.

Wait and see. And hope for a warm winter.

Here are some pictures, including a glorious photo of hive No. 1 still alive, as well as the traps.