We’re very excited to have our first honey harvest! Yesterday I extracted ten (10) medium-sized frames of honey and this morning we bottled it.
Having never done it before I was needed to know what to do. As with most “grass-roots” hobbies information and communication are not strong suits of the bee industry. I sat down and read the “instructions” that came with our extractor and uncapping knife – suffice to say they were horrible. Decent information but haphazardly presents and NO illustrations or photos. So I looked at the bee keeping for dummies book and it just glosses over extraction, once again with no photos.
I guess they just figure we’re supposed to be born with the knowledge of how to extract honey.
So I went online to YouTube to search for videos on uncapping and extracting. I was met with a decent amount of success but frankly none of them were overly great. Huge opportunity to improve the process and education of the process in my opinion.
Taking a step back here is what extraction is all about in a nutshell:
- bees make wax cells on a frame, fill them with honey and cap them off, all in a very organized manner.
- we pull the wooden frames, filled with capped honey and put them in a food safe “air tight” bin.
- we set up all our equipment – uncapping tank, knife, extractor, and honey bucket.
- take a frame and run a knife along all the cells, removing the layer of wax that caps each cell, like filleting the skin off of a fish, drop all the wax cap pings into the uncapping tank for later.
- place frames in extractor (standing up length wise, bottom of frame in direction of travel), close the top and spin for about 4 minutes.
- flip the frames over so the other side faces out, and spin again, all the honey hits the walls of the extractor and flows to the bottom.
- place a 5 gallon food safe bucket under the extractor gate, with a fine mesh filter insert on top of the bucket.
- open the gate at the bottom of the extractor and watch the honey flow.
- repeat for all the frames of honey you have.
- wait a night then pour the honey from the bucket into jars, voila! fin.
Everything we did was done at room temperature in my studio. We washed everything ahead of time. In theory you should warm the frames up to 90 degrees for two days, but that sounds like a lot of work to me.
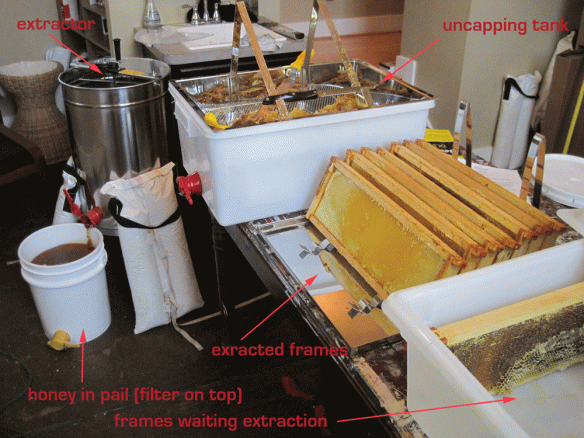
This is my set up for extracting honey, in my art studio.
Uncapping
I started out by uncapping a frame. We got a free electric hot uncapping knife and a regular one. Without going into morbid details, the electric one is used because everyone needs everything to be electric; there is a chance it can burn your honey. And it’s a bitch to clean afterwards. The “cold” knife is just a serrated flat blade. Supposedly you warm it up with hot water and cut caps off.
Well I tried the cold knife first and it worked like garbage. I did not warm it up, instead relying on its serrated edge. I massacred the first frame but did get the cap off. After that I didn’t even want to try the hot knife, mostly because I didn’t want to clean it. But another reason is because I think these knives were designed to work in a perfect world, but that’s not the case. Look at this illustration I made:

Uncapping the honey frames is easier said than done. The uncapping knives made by the bee industry leave much to be desired.
The bees make honey comb in a not always perfect manner. The knives are designed to slide along at a certain height, even relying on the wood frame to act as a guide. If the honey comb ungulates below the wood frame line or is in any way not a flat plane then the standard uncapping knives are useless in my opinion.
After massacring two frames I said “screw this”, went to the kitchen and got a serrated meat cutting knife. A fishing knife would have worked well too if it’s serrated. And like a charm I went about carving off all of the caps without any problem. I found it elegant and meditative compared to the brutality of the regular capping knife.

Uncapping honey using an uncapping knife. I don’t think these knives are the best tool for the job; the overall design of everything leaves much to be desired.

This is an uncapped frame after using the standard uncapping knife.
Between you and me, I think that half of the crap invented for endeavors such as bee keeping are created by people who are really good at raising bees, but are, at best, marginal inventors and designers. Not to be a pompous designer (I am though), but I see it all the time. You could fall out of bed and improve upon the status quo. (It’s just frustrating because it could be easier to learn and do this but the effort is mixed at best)
I think part of the goal with any uncapping is to leave nice cells on the frame so the bee have less work to do when you reuse the frames with the wax comb already in place. Well, if it were up to me, I’d rip ALL the wax off, make candles and let the bees start from scratch.
I don’t know why we have to coddle our bees when it comes to honeycomb. And the stock knives did such an awful job uncapping that I probably should have ripped the comb off.
Extracting
After two frames are uncapped I placed them in the extractor. Once again, NO ONE will show you how to place the frames in. The extractor is a wire basket with no discernible way that you put the frames in. Apparently you just set them in there. My anal retentive self would have designed it to be more intuitive, or at least provided illustrative instructions, but once again: the bee industry is more adept at raising bees than communicating method.
Before I extracted though, I placed a food safe 5 gallon bucket below the spigot (gate) in the extractor. The bucket came with a fine mesh filter that you place on top of the bucket. The honey will have a bunch of wax and bee parts when it comes out of the extractor so that needs to be filtered out.
Also I placed 50 lb sand bags on the legs of the extractor. If you spin a couple of frames that are different weight then the whole extractor will dance across the floor.

The extractor works by using centrifugal force. The honey flies out of the cells as they spin around, it hits the walls and slides down to the bottom.

I had to guess how to place the frames in the extractor. Regardless the bottom of the frame is the leading edge. Once one side is extracted, flip them over and do the other side. I spun them for about 4 mins. each time.
I guessed I was doing it right; had two medium-sized frames (all our extractor can hold) inside the wire basket. I do know that the bottom of the frame should be in the direction of travel (honeycomb is actually built at a slight angle), and I knew that I’m supposed to rotate the handle clockwise).
I started spinning frames.
I have no idea how long you’re supposed to spin for so I spun the thing for 2-4 minutes per side. I’d pull the frames out and they were lighter and I didn’t see any honey inside the cells.
Good enough for me.
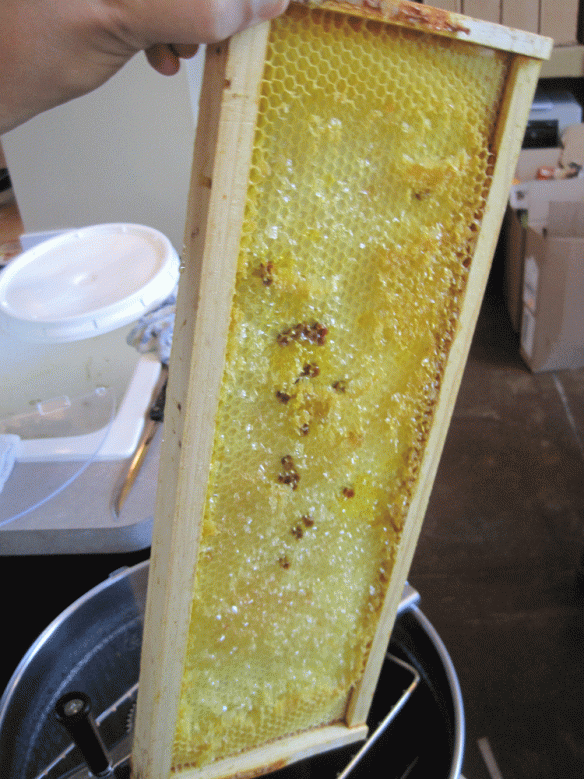
An extracted honey frame.

Close up of an extracted frame. You can see several cells that didn’t get uncapped and they still contain honey.
The honey flows as you spin, from the extractor to the bucket. It’s pretty cool.
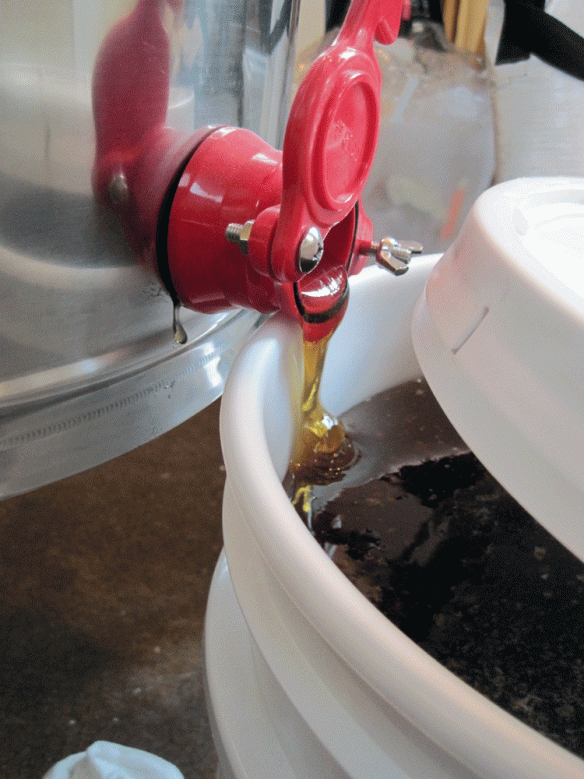
Honey flows from the extractor as we extract, into a 5 gal food safe bucket with a fine screen filter on top.

This is the honey resting on top of the filter. The honey flows through and all the wax and bee parts stay up top.

We extracted ten frames.
Note, the stupid extractor legs are too short and not adjustable so I had to jack them up to get all the honey out. Regardless, use a spatula to get the last bits of honey out of the extractor the next morning.

The makers of the extractor didn’t make the legs long enough so I have to prop them up to get the last of the honey out.
I placed the spent frames on a handy-dandy stand that came with the uncapping tank. Of course the stand is too narrow by about a hair so I had to wiggle the frames in place to make them fit – another bad design. Plus it would be nice if the stand (a big piece of plated metal) would also act as a uncapping tank lid. But hey, that would be too logical.
All the wax and honey from uncapping sits upon a perf screen in the uncapping tank. We’ll let that sit for a few days and then bottle the honey from there too, after running it through the mesh screen and bucket.
We yielded 20 8oz. bottles and 22 4oz. bottles of honey (or vice versa). I don’t know how many “pounds” that is other than saying 16 fluid oz. = a “pound” so 15-1/2 pounds. I don’t think that’s right. Regardless we have a boat load of jars.

This is our set up for jarring the honey. It’s best with two people. One filling jars and the other capping and resupplying jars. Takes about 20 mins to fill 40 bottles.

Filling our first ever jar of honey.
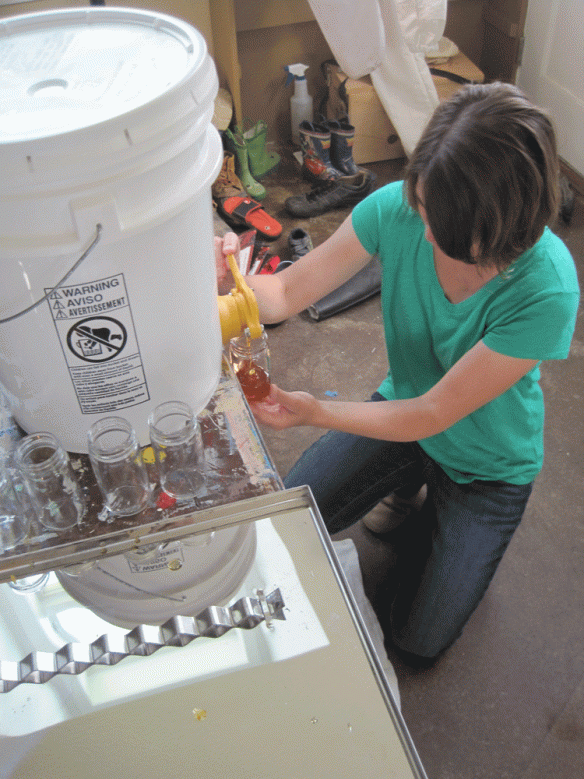
It’s best to have two people when extracting and filling jars.
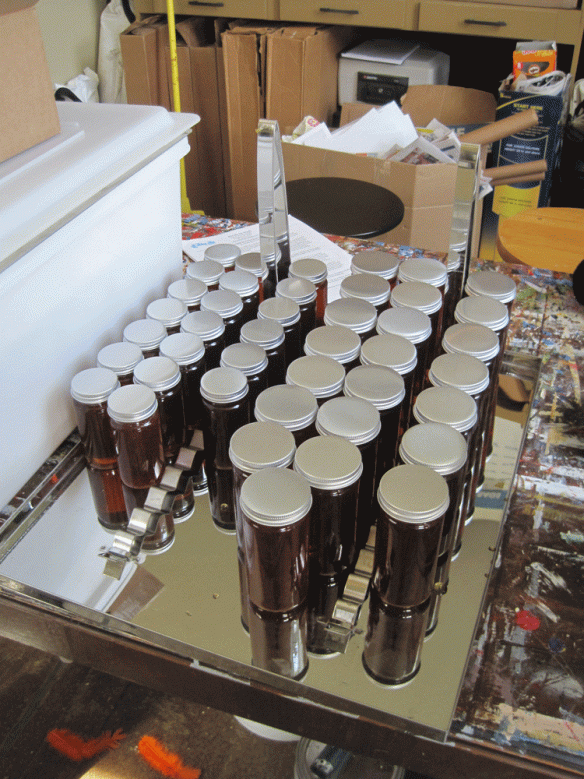
22 8oz. jars and 20 4oz. jars is our harvest so far. We still have to pour what we get from the capping tank and what’s left in the bucket.
Clean Up
Everyone flips out about how messy the process is. If you ask me it’s not a big deal. I worked methodically and was able to keep spills and drips to a minimum. I had four damp rags on hand and I have a sink in my studio perfect for washing sticky hands.
I placed the frame bin and extractor on their sides, out back by the bee hives. The bees will gladly clean those up, then I will wash them. The extracted frames go on top of the hive and the bees will clean them up as well. I’m still on the fence – I may pull more wax honey comb from those frames to start making wax blocks for home use or resale.
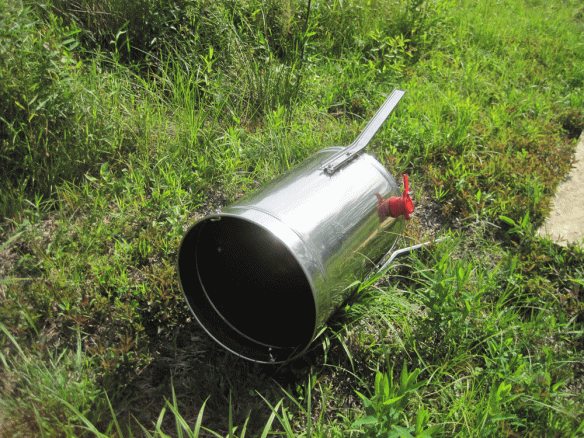
I simply set the extractor out in the yard for the bees to clean up. Then I’ll hose it off and wash it.

We placed a medium box filled with the extracted frames so the bees can clean them up in hive No. 1.
My Take-Aways:
- It’s not that messy of a process if you take your time.
- Uncapping knives / frames are poorly designed for the uncapping process.
- You can just use a serrated kitchen knife to uncap.
- Extractors should be taller than a 5 gallon bucket and have adjustable legs.
- You need to ballast or bolt down your extractor.
- Instructions for the honey harvest process are dismal.
- The harvesting process can be very relaxing and meditative
So there you have it. It’s awesome to finally have honey from our hives (actually hive No. 1). And we got a lot. I’m not sure what we’ll do with it all, but we’ll definitely need to sell it one way or another, just because we don’t need that much honey. I’m going to make labels even.
Beekeeping is an amazing and wonderful endeavor. I highly recommend it to anyone who is interested. It’s easier than you think, though it’s not easy per se.
Now we can’t wait to harvest more!
Ask any questions in the comments below.

A jar of our wildflower honey.

The obligatory Daisy photo.


