Yard Work

There’s a definitive lull in work this week (and last week). I’ve spent part of the last two days working in the yard: cutting grass, trimming, attending to plants in need and working on the sandbox.

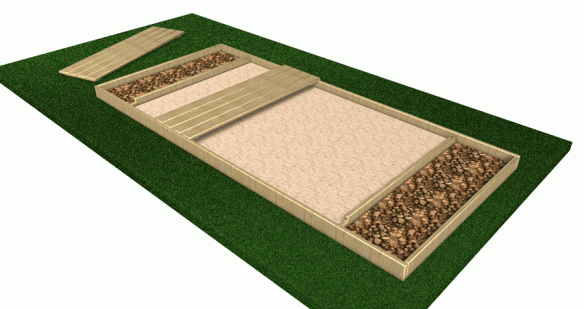
Last things first, the sandbox is done. Turns out one of the posts I set is off by a good inch, so the box perimeter is out of whack. Nothing a strategically places bush can’t fix, but when I put the “cover” panels on, something seems amiss.  Well I’m not going to fuss over it. It is what it is, as the cliché goes. Now I just need sand and gravel to fill the various bays and the box will be ready for bulldozers and excavators.

In the front yard I worked diligently trying to save a couple of our gum trees. We have five. One looks great. Two look okay. And two look near death. I think it’s all the rain water that flows through where they live. I took the brush cutter and cleared out around each tree. I rubbed some Tree-tone fertilizer into the earth around the base of each tree. And then I capped a few of them off with some mulch. I hope they make it.

I also used the brush cutter to freshen up the nature trail. The trail is still pretty muddy and wet, since the deer now use it as a main thoroughfare. One happy occurrence on the trail and elsewhere is, we’ve got sensitive ferns popping up everywhere. It’s a banner year.

Lastly the east meadow has a sparse blanket of yellow flowers. They punctuate the green canvas. The east meadow is by far the most picturesque I’d say. The last two or three years we’ve gotten these great yellow flowers over there.

Lavender Honey Beer

We’ve got a cookout coming up for Memorial Day. I laid claim to Memorial Day weekend for a friend / family cookout because I’m always jones-ing for a cookout after the long winter, plus it’s the unofficial kick off of nice weather in Northeast Ohio, and it reminds me that I have to buy my wife an anniversary present.

My friend brews beer as a hobby so I put in a special request to have a beer made specifically for the cookout. I like the idea of creating special beers – coming up with a name, creating cool labels, perfecting the recipe year after. Well I know nothing about brewing and have enough hobbies as it is, so best to let the pro take care of the technical beer stuff, and I can glam onto the arty bits.

The thought I have is to come up with four seasonal beers and try to use ingredients that we grow here on the “farm”. We have so many potentially great flavors to choose from: honey, apple, peach, blueberry, raspberry, black berry, choke and service berries, even lavender, sunflower and peppers, just to name a few. Unfortunately nothing other than honey is growing on the farm any time soon. My blueberry, raspberry and blackberry bushes took a huge hit this winter. The peaches won’t be read til Fall, if at all. And I’m not even sure we’ll get apple blossoms this year. The honey is ready but we won’t extract any until late May or June.

So for this first batch of Memorial Day beer I selected two flavors that we at least could have in theory, someday: lavender and honey. They sell these ingredients in stores so we just went that route. I’m calling our Spring beer ‘Lavender Honey Spring Ale. Here is my sketch for the label (full disclosure, I traced the lady for my first sketch from another artist, but will try my hand at drawing my own for the final).
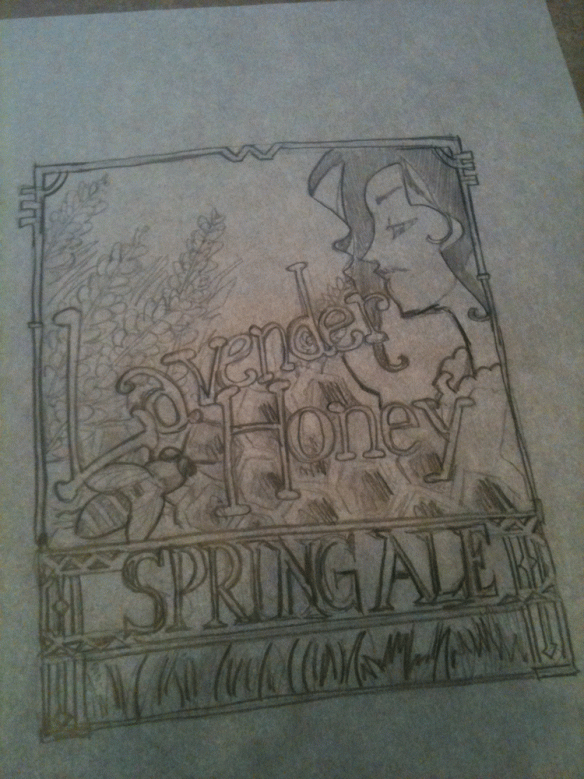
My preliminary sketch for the "Lavender Honey Spring Ale" label

My preliminary sketch for the “Lavender Honey Spring Ale” label

So you get the idea. I’ll steal some mat board from the wife and pull out my pen and ink for the final. It’s actually a fun art project; will be nice to get into the studio for a change.

Tonight was bottling night so I trekked (i.e. drove) on over to my buddy’s house and got to help bottle our first beer (well “my” first beer).

We started out by counting out 50 bottles. The batch was about 5 gallons almost.

bottles and caps waiting to be cleaned. My OCD in action.

bottles and caps waiting to be cleaned. My OCD in action.

We cleaned all the bottle in some sort of fancy solution in the sink and let them dry and a cool drying rack. We reused beer bottles by the way though I suppose you could buy new ones.
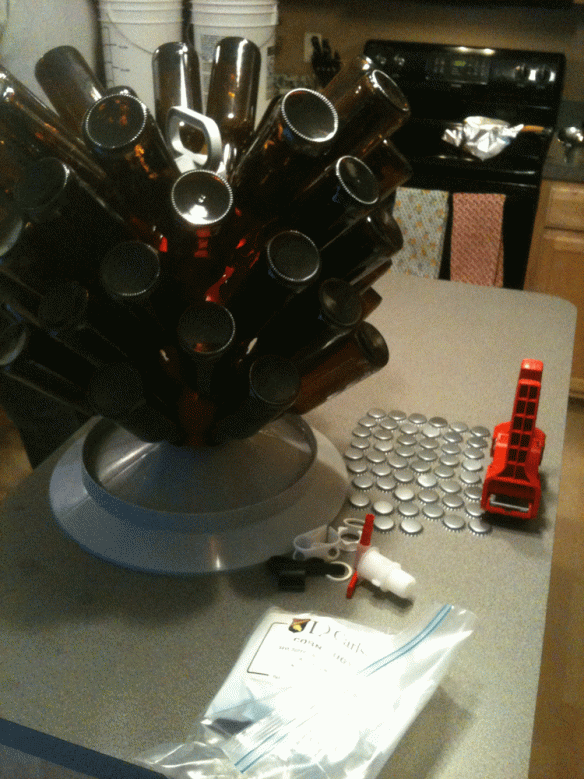
Bottles drying, ready to be filled up.

Bottles drying, ready to be filled up.

Then we emptied the bucket that the beer was brewing in, into another bucket, leaving behind all the nasty yeasty bits.
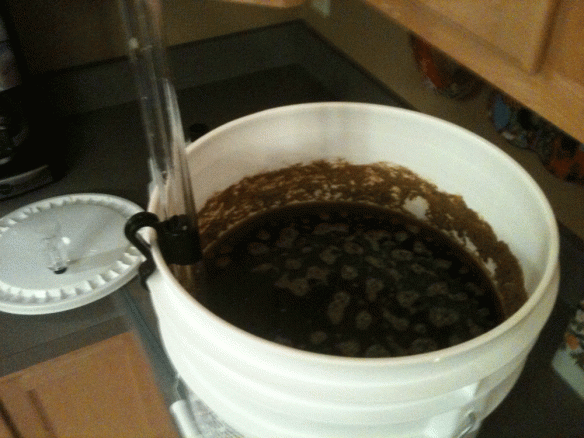
The gunk left behind as the bucket drains out into another.

The gunk left behind as the bucket drains out into another.

Transferring beer from one bucket to another.

Transferring beer from one bucket to another.

From there my friend tossed the bucket up on the fridge to let gravity help us fill all the bottles. There’s a cool pipet thingy that allows you to fill up the bottles 12 oz. at a time. I then capped each bottle.  He let me fill a few too. It was a pretty cool experience.

Finished beer, just needs a week to carbonate.

Finished beer, just needs a week to carbonate.

The flat beer will now carbonate for a week. Then we can open one and see how it tastes, carbonated. We actually tasted it tonight and it did not taste like soap, which is good. You can definitely smell the lavender. The beer has a nice color to it as well. It’s just that right now it’s warm and flat so you don’t want to drink a lot of it.

The beer looks good and tastes good.

The beer looks good and tastes good.

I’ll have to find some me time this week to ink the label by hand. Like I said it should be fun.

I’ll have to come up with a few more ideas for Summer, Autumn and Winter.

Beyond the beer, I worked on the sandbox this afternoon. I was playing Mr. Mom watching the boys. It was a nice afternoon outside so we went out, they played and I worked. Soon they were back inside though so I didn’t get much done. I’m trying to get the box done by Memorial Day if possible, which shouldn’t be a problem.

I got exactly 20 mins. in today on the sandbox.

I got exactly 20 mins. in today on the sandbox. I used my favorite screws to mount 2×10’s to my posts. Everything is fairly level.

The only issue I have with the box is, the sand. Normal sand you buy in the store, like at Home Depot or Lowes is silicate made from crushed quartz which causes cancer. So I’m looking for natural safe sand, like you’d find at the beach (presumably made from limestone sea shell like material). The only place I found so far is in California and the cost is astronomical to have it shipped to Ohio. I could make my own, but I need like 2,000 lbs. There is a “natural” sand made by Sakrete that they claim is safe, but really it’s not. I think that’s the route I’ll go and just make sure the sand is “wet” whenever the kids play with it and make sure their hands are clean after. Or the kids may just get dirt and rocks to play in the sand box.

I don’t understand how these companies can market this stuff to kids with a cancer warning label on it.

Anyway, there always seems to be something to worry about. Most people would say “Oh you worry too much”, but then how many people do each of us know who have gotten cancer inexplicably in their lifetime? And it’s not like it’s a mystery, the labels tell you right out of the gate: this causes cancer.

Right now the boys are playing in the mud I created in the sandbox area and are happy enough. Maybe we over think things.

Maybe everyone who comes to the cookout could bring 80 lbs of beach sand as an offering.

Do you have any ideas for what to do with the sand box? Or where to find safe sand?


Sandbox

Okay, we switched gears yesterday and we green lighted the sandbox project.  Our little guy’s birthday is coming up and there’s an off-chance the weather might be nice throughout October, so we got rolling on the sandbox starting yesterday.  Also our available weekends are dwindling so I thought it a good idea to start this weekend.

First thing yesterday I spent some time on the internet looking for ideas and, quite frankly, maybe a set of existing instructions to hasten the pace of construction. I saw a lot of great ideas but in the end just designed my own thing.  Some good pointers I did pick up regarding design included: make the box at least 12″ deep so there’s room to dig, and 4’x8′ makes a nice sized sand box.  We wanted our a little bigger, so I designed it to be roughly 6′ x 9′.  To make sure this was a good size I roughed out that size of an area in the Family Room with tables and pillows and asked my clients if this was okay. Both little boys approved and proceeded to play in their pretend Family Room sandbox.

Here’s what I came up with:

6x9 sandbox, with two gravel partitions. Covers slide along the side rails and are removable.

6×9 sandbox, with two gravel partitions. Covers slide along the side rails and are removable.

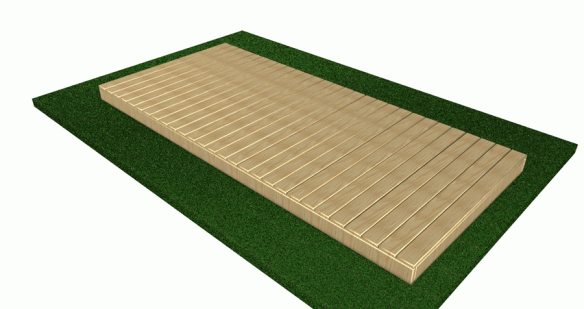
The unique thing about our sandbox will be the two gravel “pits” at either end. Why limit play time to just sand. We’ll fill each pit with a different size of stones to add some variety. I also plan on sinking some “boulders” into the sand section.  The covers are designed to keep cats from using the sand box as a litter box. Also, my hope is that the covers can double as seats and flat areas to play with trucks and cranes. One thought is to make them reversible so we can flip them over, and I would attach ramps and other features to drive trucks on the back side of some of the covers….we’ll see once I get into constructing the sand box if this is possible.  My only concern is that the covers, made of 5/4 boards, won’t be stiff enough to sit on, or they will sag. Right now I just have a 2×4 on the back side to construct the cover sections.  I’ll adjust the design as necessary once I start building.

Sandbox with all of its covers in place.

Sandbox with all of its covers in place.

Sandbox dimensions. The covers for the gravel pits aren't shown here.

Sandbox dimensions. The covers for the gravel pits aren’t shown here.

The perimeter is made from 2×10’s. I’ll dig down about 6″ then lay in my 2×10’s, connecting them at four points to 2-1/2′ 4×4 posts so the top edge is about 14″-16″ above the bottom of my dig out….ultimately the goal is to get 12″ of sand space plus a couple of inches below the covers.  Once again, I’ll kind of plan as I go and as far as my back will bear digging and clearing earth.

Orange spray paint marks the location of the sandbox. The area receives sun as early as 10am in the Fall, so it should be a nice spot to play all day long. I'll clear out the brush behind the sandbox.

Orange spray paint marks the location of the sandbox. The area receives sun as early as 10am in the Fall, so it should be a nice spot to play all day long. I’ll clear out the brush behind the sandbox.

I've started roughing up the area for the sandbox with a pick ax and tiller. It needs to be cleared and level before I can start building.

I’ve started roughing up the area for the sandbox with a pick ax and tiller. It needs to be cleared and level before I can start building.

We selected a space in the yard by the play set, that gets decent sun, is near where all the “action” is yet is out-of-the-way somewhat.  I marked a 16′ x 6′ rectangle along the west preservation area. The landscape plan shows a planting bed in this area. What I’ll do is take my cool new (yet to be delivered) brush cutter and clear out some of the preservation area from a crab apple tree to the play set and then next year we’ll plant it with the bushes per the landscape plan. This will hopefully keep ticks at bay while the kids play in the sand box. The orientation of the sandbox is right in line with the play set so my OCD should be held at bay. Eventually we’ll flagstone the entire area from porch to sandbox to future pavilion creating one huge outdoor living space for family and friends.

One concern I have is water flow across the area, but I believe the sandbox will be higher than the surrounding area and water will flow across the future patio area between the sandbox and porch towards the north gardens. By the way, our left over landscape fabric will come in handy; I’ll lay down a layer on the ground inside my 2×10 perimeter of the sand box to keep plants from growing up in the sandbox.

After drawing the plans for the sandbox I went up to the lumber store and ordered the pressure treated wood. I have a ton of 5/4 boards left over from house construction so I didn’t need any of those. For ~$120 (w/ delivery and tax) I got two 14′ 2×10’s, a couple of 12′ 2×10’s, a 10′ 4×4 and a pair of 2×4’s. I also ordered a bag of cement for the posts. (Note to my brother  if you’re reading this…yes I just realized you said you had some left over material I can use…Hmm…I’ve got other projects we can use that for….I really want horse shoe pits and / or a bocce court….maybe a bench or something for our nature trail.)  

Once everything was ordered I went home and took a stab at preparing the plot of land for the box.  After pick axing two 6′ lines and a 16′ line I had to sit on the porch and focus on not puking up my lunch. I tried to remember why I liked working outside in the first place. My 4×8 home office cube didn’t seem that bad after all.  My son asked me why I was sitting down and I tried to explain to him that his dad was out of shape and was quite possibly going to die within the next seven minutes. I had visions of dying there in the yard and my kids poking me with a stick for three hours until their mother got home.

Enough manual labor for one day.

I grabbed the electric tiller and started roughing up the ground but was cut short due to a rain delay. All wet and muddy we, the boys and I, trekked back inside, our work done for the day.  I’ll try to venture back out there later today and get the area prepped and ready for the brush cutter and lumber delivery. We should have a sand box in no time.  Though I wonder about where I’m going to get sand and how am I going to get it back there.

One other thing, once I get my new brush cutter, I’m going to free those gum trees and get that bat house planted.  Also I just realized I have to clear a spot for this year’s live Christmas tree.  I can’t believe it’s that time of year already.

Not nearly enough time.