Basement Planning and Pricing

Before we jump into all the “fun” work I’ve been doing in the basement for the last six weeks, let’s do a post to go over our game plan.

Budget is the biggest driver for the project. We have zero money frankly, but as I said in the last post: we feel strongly that we need the space to be useful, otherwise what’s the point. Before the project the basement was full, no exaggeration, of “stuff”. Furniture, half filled boxes, years worth of stuff that had just been moved from house to house. For example, in our old house we had a library filled with books. There’s nothing like that in the new house, so there are just box after box of books. My wife collects board games and we’ve never once had a place to store and display her very extensive collection. I have every car magazine from 1986 to the early 2000’s. Yes, those can be recycled but I’d like to go through them first. Point is we have more crap than most of you combined.

The basement has to stop being a big catch-all.

Okay, back to design and our plans. Here are the main project areas. I’ll go over them in detail in subsequent posts.

Exterior Walls

When we built the house, you may recall we used Superior Walls for our foundation. The basement walls are prefabricated out of cement and steel, and stand nine feet tall (9′). The walls feature metal stud facings so we can apply drywall directly to the face of them. No need to fir out the walls which saves a lot of time and money. I just need to frame in a few of the corners with drywall nailers. Note, we would also have to frame in for any shelf or cabinet supports ahead of time. Superior walls cannot support a vertical load so don’t go screwing in cabinets into the studs. More info, and to see nailer diagrams, click here.

Insulation

The foundation walls are insulated to R12.5 from that factory with blue rigid insulation. When we installed them I speculated that we would insulate them with another R-20 worth of insulation, which I think is the maximum if we fill the rest of each cavity with sprayed insulation. Well to keep costs down we did two things 1) only insulated the top 4′ of the exterior walls and 2) went to a depth of 1.5″ (R-10). Why? The top half of the wall has the most exposure to outside temperature changes. Once you get beyond 4-5 feet the earth’s temperature is pretty stagnate, something like a constant 50 degrees or something (I’ll let you look it up). By the way, cost to insulate the top 4′ with 1.5″ of 2 lb. spray insulation (R-10): $2,164. Three inches (R-20) would have been $4,040.

Floors

The floors in the basement are cement (over 4″ of rigid foam insulation by the way). Our basement is prone to flooding if the sump pump ever fails, so that drives many of the design decisions we’ve made in regards to our basement project. Long term our plan would be to cover the entire 950 sq. ft. of living space with ceramic or porcelain tile. Short term though we’ll leave it cement. I’ll rent a floor cleaner from Home Depot and clean the cement myself. Not sure if I’ll seal it at this point. I’ll decide when the time comes. We could stain the floor like we did in my studio. That is always an option, in lieu of putting tile down. For now though regular concrete will suffice everywhere, though the bathroom will likely get tile right out of the gate. Cost should just be a few hundred dollars for cleaning and any tile.

Ceiling

There is some debate whether to put in a drywall ceiling or suspended ceiling. Drywall is cleaner and more finished. Suspended ceilings give you access to HVAC, water and electrical. If you think about it, the other floors of the house are covered in drywall with no utility access. So I think drywall is a fine choice. The problem with our ceiling is there are a lot of pipes, ducts and other obstacles that I don’t want to, or can’t, soffit around. We’ll be putting a drop ceiling in all the living areas except the bathroom. Armstrong has a wide selection of ceiling tiles and a lot of inspiration shots on their website. I got a quote for installing a generic Armstrong system: $3,500. I’ll do it myself. Hopefully the material cost will be closer to $1,000-$2,000. We may hold off and do this next year if we can’t afford it.

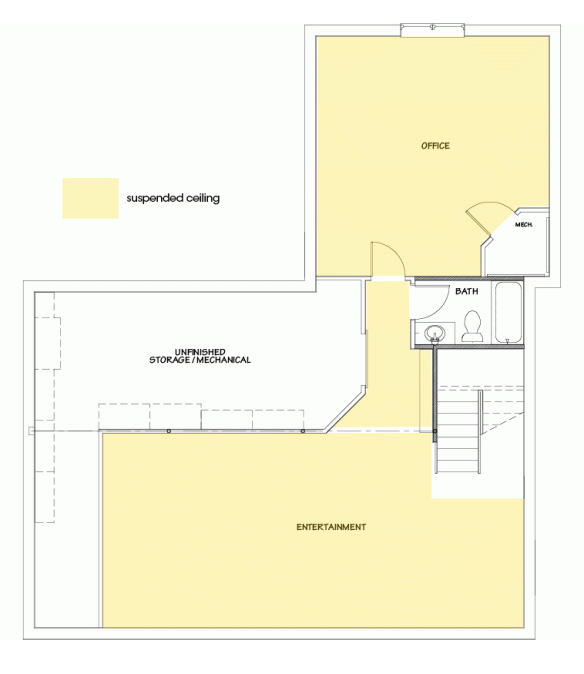
The yellow areas will likely be drop ceiling.

The yellow areas will likely be drop ceiling.

Interior Wall Framing

Because of the potential for water flooding should the sump pump fail, I was hesitant to use wood framing. If the basement flooded there’s potential for mold to grow in water-logged studs and walls. Regardless always put down pressure treated sole plates, but I didn’t feel like using treated studs. I was curious about metal framing so that’s what I went with. I still used wood for soffits, blocking and ceiling areas. Look for my thoughts on metal framing in a future post. Cost wise we got an estimate for $1,791 to have someone else do the framing. I did it myself, learned a new skill and spent about $750 on materials to partition the basement. By the way, this includes material for desperately needed storage shelves in the storage room.

Electrical

I don’t do electrical so we’ll have to hire a pro. We’re doing the bare minimum. With the drop ceiling and good access from the storage room we can add-on later. For now it’s all switches, outlets, and ceiling cans. I’d like to swing for 4″ cans but may just default to 6″ to save money. Would like to populate them all with LED bulbs though. Cost estimate for electrical parts and labor is at $4,000. Yikes!

Walls

We’ll drywall everything. I may put 12″ of cement board at the bottom of every wall because of the aforementioned water damage potential. Or not. Estimate we got was $3,757. Doing it myself will hopefully save some money. But I don’t have the patience or craftsmanship (or desire) to mud it all so I may have to source that.

$4K electric, $2K insulation, $1K framing, $3K drywall = $10K, then do the ceiling next year or down the road maybe. We’ll see. I just hand over receipts and the wife keeps track and cuts checks.

Stay tuned for future posts on each step of the way. As of this writing I’m wrapping up framing and the insulation is done.

-Chris


New Year’s Update

The eve of the New Year finds the land covered in a blanket of snow. The boys having gotten sleds from Santa this year finds me with the urge to be a kid again and go sledding. I’m not sure the quality, or quantity, of snow is there yet to go out, but New Year’s Day could prove to be most enjoyable if we find ourselves on a sledding hill. In the meantime I find myself working through a cornucopia of tasks and endeavors, with a fair degree of accomplishment. The ambiguity of my daily life is like waves on the shore; sometimes calm lapping the sand, other times crashing and tumbling. Regardless there’s always another wave which is good.  Here are today’s miscellaneous waves.

Super Food

Okay we got on a kick around Thanksgiving and starting eating kale. I don’t know what prompted this, but we really like it, even the boys. I got ‘Fifty Shades of Kale’ for Christmas, it’s a cookbook with a cute writing style. There are actually only forty-eight varieties, but there are fifty recipes in the book. From the Amazon overview:

Release yourself from the bondage of guilt and start cooking meals with the ingredients you love: meat, cheese, and yes—even butter. Nutrient-rich kale provides essential vitamins and minerals to keep you healthy, happy, and lean—so you can indulge in your most delicious desires. Whether you’re a cooking novice or a real kale submissive, you will undoubtedly succumb to Kale’s charms.

While I haven’t tried any of the recipes yet, it looks like a good cookbook. Yesterday the wife made kale salad for lunch, which is always good. I believe she usually includes kale, balsamic vinegar, pomegranate seeds, lemon….and I think that’s it. Occasionally, like yesterday, she included quinoa, which are little protein thingies that resemble grain but are actually related to spinach. Both kale and quinoa are ‘super foods’ that are super good for you. One plus about kale, we find it doesn’t wilt as fast as lettuce, it’s always firm…albeit sometimes difficult to spear with a fork.  The salad I ate was delicious and infinitely better for me than anything else I could think of to eat for lunch. Kale is going to be one of my ‘vegetables of the year‘ in our garden for 2014. I plan on focusing on growing kale, along with sunflowers in the coming year. Sure we’ll have other veggies (fruits, etc…you know what I mean) that we grow in the estate garden, but we’ll make 2014 the year of kale and sunflowers in our yard. I’m hoping to have enough sunflower seeds to give some away in the fall as gifts.

Kale salad, next to my new kale cook book.

Kale salad, next to my new kale cook book.

Cats

The kitties are all getting along relatively well. I took the two new kittens to the vet yesterday and they checked out fine. They are gaining weight nicely. We’ve taken to calling Dixon “Mr. Goo” as you can feel how much weight he’s put on, though he looks fairly lanky still. My little tuxedo buddy is like glue, always on my lap or curled up in bed. Hey, I guess if  you gotta have a friend in life, there are worse things in life than a cat.

Dixon is trying to warm up Ms. Daphne but she’s still pretty cold to him. He goes up to her and lays on his back but when he goes to pet her with his paw she hisses at him. Typical woman.  Sorry Dix.  I feel your pain friend. One word of advise, It may be because when you finish your tuna to storm over and start eating Daphne’s too….women don’t like that.

Daphne, Daisy and Dixon aka "Mr. Goo" getting along eating tuna.

Daphne, Daisy and Dixon aka “Mr. Goo” getting along eating tuna.

Charging Station

When I was Christmas shopping in Macedonia, Ohio last week I noticed a big tarp “tent” in the parking lot with a ‘Tesla’ logo on it. Too small to be a car dealer I looked up online and found out it’s a Tesla charging station. Go figure an electric car charging station in our neck of the woods. Very, very cool. Kudos to Macedonia leadership for having the foresight to approve construction and welcome the station to their town. We need more of this sort of thing if we are to progress and succeed. I wish I had the means to get an electric car. In theory our garage is ready to go, since we put a separate breaker box in the garage when we built it, so installing a home charging station should be easy.  Someday.

Tesla electric car charging station under construction.

Tesla electric car charging station under construction.

Basement

One project I’d like to start nibbling away at in 2014 is our basement. I realize that we don’t have to get it all done right away, but getting the basement straightened out would be a boon to the rest of the house.

My family (including me) has crap all over the place. I need to get all this crap pushed away into some space that isn’t my family room. The basement will be a great place for the litter boxes, toys, etc.  The kids can go down there and do whatever they darn well please and I can get my family room, dining room and kitchen back, each devoid of toys, inventions and tricycles.

I don’t know when we’ll be able to afford the basement project but I am starting to get pricing to know what we need to save for. First up is insulation. We had our friends at R-Tek Insulation in Barberton, Ohio give us a quote for insulating the basement. If you recall our Superior Walls – Xi basement walls give us an R value of 12.5. Our plans show R-20 worth of closed cell spray insulation in the bays (for a total, floor to ceiling of R-32.5). We got that insulation quoted during construction and it was around $13K, which we can’t really afford. In talking it over with a few professionals the next thought is to insulate the top 4′ of our 10′ walls which will get us below the frost line.  The two options then are to spray 1.5″ or 3″ of foam, which would give us an additional R-10 or R-20 respectively, for a total of R-22.5 or R-32.5.  Cost is around $2K or $4k for each option, which is do-able from a budget standpoint.

One note, for reference, our architect recommends R-40 for exterior walls. So while not quite there, we’ll be close. Even if we just use 1.5″ of foam at the top 4′ of wall, we should improve the comfort of the basement and home enough to make it worth while. Heat loss below the upper 4′ should be minimal. One area we may spray floor to ceiling will be where the basement window is since final grade is pretty low over there.

The closed cell insulation is sprayed on and hardens to provide an air and water tight seal. This is important because we’re trying to make the house as tight as possible, and our basement floods if the sump pump doesn’t work.  If we were to spray floor to ceiling this would be important because if we used fiberglass or cellulose insulation, were the basement to ever flood the insulation would be ruined and have to be replaced.  Important to keep in mind. Spray insulation is well worth any added cost for that reason alone. In our case obviously though we’re just doing the tops of the walls so it’s a relatively moot point.

Therma-Tru Doors

I’m still working on getting the exterior doors sealed up. I can see daylight on the double doors, its been this way since Day 1, so I called my Therma-Tru dealer and they’re going to see if they can have a technician take a look. I know what the problem is, I just don’t know how to fix it. Fingers crossed they can fix the problem.

That’s it for now. Have a safe and happy New Year’s everyone.

-Chris

Phase One Wrap Up

The excavator has started to back fill the house and garage.  This will make the property look a bit different and closer to what it looked liked about a month and a half ago when we cleared out the brush.  With the exception of the wood and cement rectangles that are the house and garage.  In my mind I kind of consider this to wrap up Phase 1 of the project.  Now we switch over to rough framing and selections.  We’re past any of the major deal breaking hurdles at this point.  Knock on wood.  (With my luck the foundation will collapse just to spite me.)

The garage is backfilled inside and out. It also proves to be a convenient lumber yard, freeing up space for the excavator and bulldozer to move around. You can't really see it but by the trash cans, I added a rain barrel. We don't have any water on site so this will give the workers a source for clean non-potable water. We got ours from Woodland Direct for about $115.

The Superior Walls require special consideration when back filling including gravel bottom to top to minimize pressure against the walls.  We also have to brace up the stair opening during backfilling.  Our blue clay necessitated a 45 degree dig so backfilling involves stepping the dig first then back filling.  Overall, the amount of gravel required in prepping the footers and backfilling the cast cement walls decimated our excavation budget.  This means that we’ll have to forego any landscaping and need to accept the push back from our building helpers on the cost of engineered rafters and other performance & sustainable features.  We’ll be over in other areas such as cabinetry, appliances and fireplace as well.  Savings will come from rebates on the windows and my ability to find fairly good pricing on the metal roof.  We’ll see where else we can save.  I have to be careful because many products out there appear to cost less up front but typically are of inferior quality or performance, or the product cost doesn’t factor all the costs associated with that product.  For instance I didn’t factor in the amount of gravel when comparing foundation options or engineered lumber performs better than traditional lumber so it may be money well spent. 

Also I’m not sure we’re getting a discount for some of the labor-saving methods we’ve employed.  For example our architect designed the home so everything is divisible by 4, which is what most building materials are sized in (e.g. 4×8 sheets).  Also he spec’d 2′ on center wall studs to reduce material and save costs.  I have to look so I’m not sure if the lumber yard picked up on that and laid out the framing accordingly.  I do know there was very little scrap left over after the rough framers built the first floor deck; virtually no OSB cut offs left over.  Not sure if our rough framers reduced labor costs because of the minimal cutting and lighter weight engineered joists.  It definitely makes their job easier.

We did push the lumber yard to provide us with trusses for the garage even though they’re a little more expensive.  This will avoid wasting old growth 2×12’s to hold up drywall in the garage ceiling.  What a waste that would be to rip some old growth forest in Canada down so I can hang drywall in my garage ceiling.  I’m assuming there are families in Canada that like forests as much as we like forests here in Ohio.  As I said before, I had to cut and run from using engineered lumber in the main house roof to appease my “builder” and to offset the cost over runs for the excavation.  We’ll be using 2×8’s which will give us 95% of the performance of the engineered rafters, and save us about $5,000.

I’m saving a lot by self contracting but it’s an uphill battle because no one really has the same perspective or philosophy as I do, so I have to do the best I can to at least sway their thinking for the portion of time they’re working on my house.  If you’ve got the money and interest, hiring a contractor familiar and sensitive to the triple bottom line may be well worth it.  The other advantage is having a contractor increases, in theory, that someone’s looking at the details 24/7 vs. my situation where a handful of people all take a small part, myself included.  Save money my way, but you have to live with imperfection, and inefficiency.  Also, cost avoidance is still hard to come by.

Who knows, maybe I can start a new career as a green builder.    Of course if we don’t sell the house we’re in now, this one we’re building will be for sale. 

And we can start all over from scratch again.

I got to walk in my basement. It was AWESOME. I do love the inside of the Superior walls and can’t wait to finish them off. You can see the bracing necessary though around the stair opening.
 

Say goodbye to the outside of the Superior Walls, they're being backfilled. Kinda sad because I've gotten used to seeing them. Here you can see the filter fabric we laid down first, then there will be 2' of solid gravel, then a channel of gravel up along the wall. The sloped walls will be stepped and backfilled with conventional material. There will be so much gravel in this area that I don't think we need a drain under the window. It should naturally drain down to the drain tile. We will have to build a retention wall on the far side of the window though. My dream is to finish this area in stone.

Foundation

It’s in.

I survived.

I didn’t do a darn thing yesterday but sit and watch real people do real work and I was exhausted.  Actually I’m still exhausted, but in my defense I did work in the yard at the old house this morning.  It’s hot in Ohio this Summer.  Too hot for my tastes.  Where’s my nice climate controlled, super insulated (from the heat), passive solar house when I need it?

Right now, it is an arrangement of pre-fabricated cement wall panels that were arranged on Friday with surgical precision to within 1/8″ of an inch across a 190’+ diagonal from one end of the house to the other end of the garage.  In fact Superior Walls and Fike Excavating worked with such surgical precision and expertise all day, it was rather boring for me.  Exactly how I hoped it would be. Nothing I had worried about in preparation for “foundation day” came to fruition.

The day started out with Superior’s crane and the first load of wall panels waiting for me in the drive and road respectively.  Not knowing what to expect I said “hello” and was greeted by Ryan and Carl from Superior (I’m pretty sure I got their names right). Ryan proceeded to back his crane up my 1/4 mile long driveway, right past my neighbor’s large tree.  Then the moment of truth came as the first semi with my 10′ tall basement wall panels turned off of the road and approached the 90 degree turn around the tree. Viola! Around the tree, no problem.  Sigh of relief on my part (yes I smiled just a lil’ bit). These guys are good.

The first truck, a sleeper cab no less, cuts around the big tree with ease.

Here's Superior's crane parked between my studio and the garage. Very cool.

 They quickly set up the crane and the semi parked in front of what will someday be the garage.  It started to rain and of course I left all my rain gear at home.  Driving home to get my raincoat did two things: 1) assured the rain would stop for the rest of the day, and 2) caused me to miss how they put the first two wall panels up.  They’re 10′ tall panels…weigh like 2,000 pounds each….I don’t know, maybe one guy held it up while they waited to lean it against the next panel.

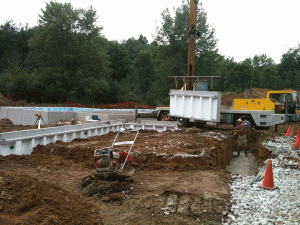
Wall panels being installed. They are bolted together and caulked at the seams. You can see all the integrated insulation and the metal stud faces.

 That panels go up quickly and soon it’s time to back out the semi to make room for truck number two.  The semi backs out of the upper portion of the drive and then to turn around it requires our excavator to lift up the back of the trailer and swing it around.  We have very little room for this type of operation but these guys are pros and it happens without a hitch.  Quickly the second truck comes up the drive, around the tree in one shot and parks on the job site.

The second truckload of panels goes in. Note the large basement window. I have no idea what we’ll use that basement room for but it will have a large window.

The Superior Wall system goes in quickly.  A truck driver, crane operator and two technicians on the ground make easy work of my foundation.  Actually in this heat it’s anything but easy.  It’s still physical labor.  I sit on a rock and watch.  So helpful. 

The foundation going in quickly is one of the reasons it appealed to us.  It took just 10 or 11 hours from when the crane showed up to when it left.  In that time team put up over 332 linear feet of fabricated wall sections, about half of which were 10′ in height.  A mason would’ve been out there hauling block for a week.  My walls are perfectly true from what I can see and dialed within an 1/8″ of location specifications. Our Superior Xi walls come with 2-1/2″ of Dow insulation built-in (R-12.5) and we’ll be adding another R-20 worth of insulation when we complete the basement.  When we go to finish off the basement I can screw my drywall right to the Superior Wall metal stud facing which will save me time and money; another reason we chose them for our foundation.  I also like the idea that it’s an engineered wall system.  I’m a designer by trade and I guess I gravitate to products that are more technical / engineered and designed rather than just slapping a bunch of raw materials together.   All these panels are made in a factory out of reinforced concrete.  Everything is strong, true and bolts together. And as we all know I’m lazy, so I like the idea of the entire foundation installation being one day, having integrated insulation and being able to attach drywall right to the panels.  There are even knockouts for my wires and plumbing.  No fuss, no muss. A lazy “do it yourself” homeowner’s dream.  And that’s me. 

My foundation beats your foundation every day of the week and twice on Sunday.

Setting the garage walls. You'll see some EPS foam on there but none of the Dow XPS blue board that are on the house panels. The garage is uninsulated so we don't need it. We were going to have the garage be block but in the grand scheme of things, it was easier to do the garage in 4' tall Superior Walls.

By late day the third and final truck rolls up to the job site.  This one carries the remainder of the 4′ tall studio and garage panels.  Our excavator had everything prepped to Superior’s specifications, even so just a little massaging of the prepped footer areas is needed.  It’s tiring work in this heat but the Superior technicians are positive and knowledgable.  By 5:30 pm the walls are in.  The last semi truck is coerced off the job site and headed back for the 5 hour drive to Lima, NY.  The crane is packed up and easily maneuvers down the drive in the deft hands of its operator.  Driving that crane on the freeway has got to be tedious.  

A special thanks to our excavator Jonathan Fike and his dad, David (Fike Development), for being on hand all day and helping to get the semi’s in and out of the property and mending the driveway.  Once again they helped make a stressful situation for me and make it worry free.Completed foundation looking across house towards garage.

 And that’s it.  The foundation went in just fine.  Now we move onto about 2 weeks of some really finesse type orchestration of tasks and trades to get the first floor deck on, the basement poured and everything back filled.  I don’t know if my stress level went down any after yesterday.  I do know that I need to drink water when I’m out there.  I was burnt when I got home.

And I didn’t even do anything.

For information on Superior Walls check out: http://www.superiorwalls.com/

Gimmie a Break

Busy day, but not on the job site.  Sorry ProjectCam, I promise I’ll be out to check on you soon.  Poor little guy, probably figured I’d abandoned him.  I’ll bring a cloth to wipe off your lens and I’ll check to make sure you’re still running.

I haven’t shared much about the house design yet.  We hired a local architect, Joe Ferut, to design our home.  I’ll tell you more about Joe in the future, and the advantages of working with an architect as well.  Here’s a pic of the front of the house:

Front elevation of the house.

I call it a contemporary farm-house.  The goal is to mimic the concept of an old farm-house or mill, kind of New England-y (made that up).  Historically it should fit in with the Western Reserve architecture of the area, or at least in my mind it does and guess what, I’m paying the bills around here so what I say is the god’s honest truth.  No questioning my immense knowledge on this or any other topic for that matter.  But I digress.  I’ll tell you more about the house style in a later post.

One of the reason’s we wanted an architect was to implement some environmentally sustainable concepts / practices into our new home.  The plan is to live there for a long time and I absolutely hate writing checks each month to utility companies.  Some people enjoy it and I’d never begrudge them for that relationship they have.  I guess I’ve just got an independent streak.  Also I’m willing to spend more up front and reap the rewards long-term. 

Full disclosure, I don’t purposefully make stuff up but I’m no expert, double-check your facts before you attempt this at home.  I’m going to spout off a bunch of stuff that I probably have no intellectual right to spout off on, but this is the internet so….I pretty much have the free reign to act smart with virtually no ramifications.  Here we go, a lesson on thermal breaks (as they exist in my mind).

I can get more into tactics in the future, but to simplify it  we basically want to keep the cold air out and warm air in the Winter and vice versa in the Summer.  We’ll have a super tight house to prevent air transmission from in and out (unless we want it to via an open window).  Even then though heat or cold can penetrate the walls so we will employ “thermal breaks” to make it tougher for all those nasty cold air molecules to “pass through” (actually I think they rub each other but we’ll keep it clean here…..) our walls.  The thermal breaks, as far as I can tell act as speed bumps or roadblocks.  Usually they’re a dissimilar material sandwiched between to other materials.  Like air between two panes of glass.  Or insulation in your wall between the inside drywall and the oriented strand board on the outside. 

Today my crack team of designers, builders and random homeless people off the street tackled the design of the thermal break in my basement floor.  I know throw in some candle light and we’ve got the making of one of those trashy romance novels, but really it’s not as romantic as it sounds in this blog.  Here’s a pic:

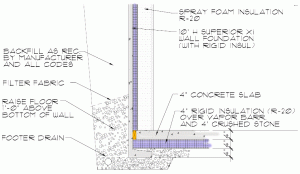
Basement thermal break detail. Can you spot it?

We need to separate the cold outside concrete, stone and earth, from the warm inside concrete, insulation and air.  The Superior Wall system we’re using has its own break in the form of integrated foam built into the wall (colored blue in the pic above).  I’ll tell you more about Superior in a future episode but take a look at ‘Extreme Home Makeover’ on ABC on any given 2011 Sunday to see their handy work first hand.

 
Back to the break.  Yours truly gets to lay down 4″ of blue foam on top of the gravel in my basement.  Voila!  Thermal break, oh heck yeah.  I colored it blue (periwinkle) in the pic as well.  I’m an artist, don’t try this at home.
 
That just leaves the nasty connection between the concrete floor and the concrete on the Superior Wall.  I can’t run foam between the two because the concrete floor is going to lock the bottom of the wall system in place.  If it was just foam the walls would squish the foam in an effort to meet up (mate?) with the concrete floor.  Then I’d have to listen to blue foam dying in my basement for the rest of my life.  Instead I’m going to separate the two pieces of concrete (wall and floor) with a thermal break made out of, you guessed it, a different material.  In this case pressure treated wood.  That should slow down or stop the cold air molecules, camping out in the dirt, from getting into my house. 
 
If you want to get more technical than that read a book or talk to an expert, but I guarantee they won’t be as much fun as me, go off on any tangents, nor will their beer be nearly as cool and refreshing as my thermally controlled beer will be, even when it’s 100 degrees outside.
 
-Chris