Garage Work Shop

A couple weeks ago I was at a party and my brother-in-law asked me if I had any projects going on around the house. I had to answer “no” because I haven’t had anything going on for quite a while. Work had been slow so funds were non-existent for home projects. And as you all know we’re always knocking around the idea of moving, so why bother. Well the last couple months have found me with a couple extra dollars in my pocket, and a raging desire to do something constructive. I have a mental backlog of projects I’d like to do:

  • garage organization
  • basement ceiling
  • storage room lighting and clean up
  • bar on the screen porch
  • paint the laundry room and bathroom
  • paint the trim and doors in the basement
  • finish staining the porch and sand box

Probably a lot of other little projects I can’t think of right now. I decided to start tackling the garage because it would be nice to fit two cars in there, and we just recently built that storage loft, so let’s get ‘er done, right?

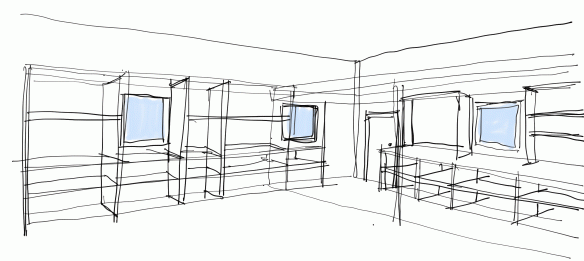
I’ve started drawing up plans for a workshop in the garage, back in September of 2017.  Here:

Workshop Model 181101

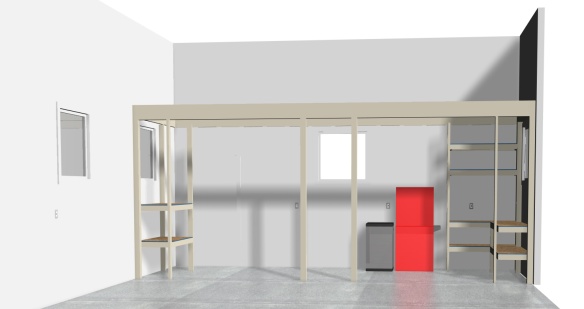
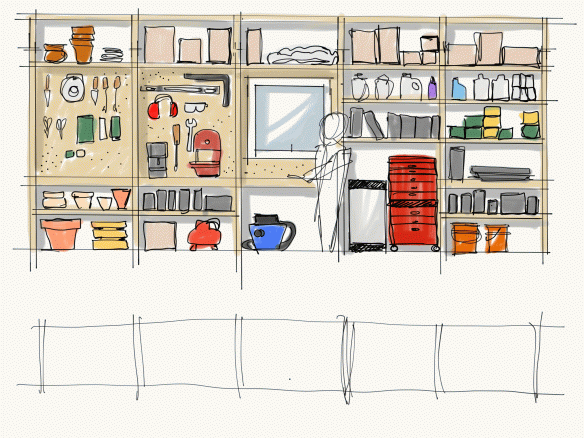
The storage loft covers the entire half bay. Below that I’m going to infill with a variety of work benches and shelves made from 2×4 lumber and plywood. These will replace the existing hodge-podge of store bought metal shelves. The red thing in the rendering is my tool chest and the silver thing is a wicked cool little mini fridge that holds frosty beverages.

metal-shelves-1

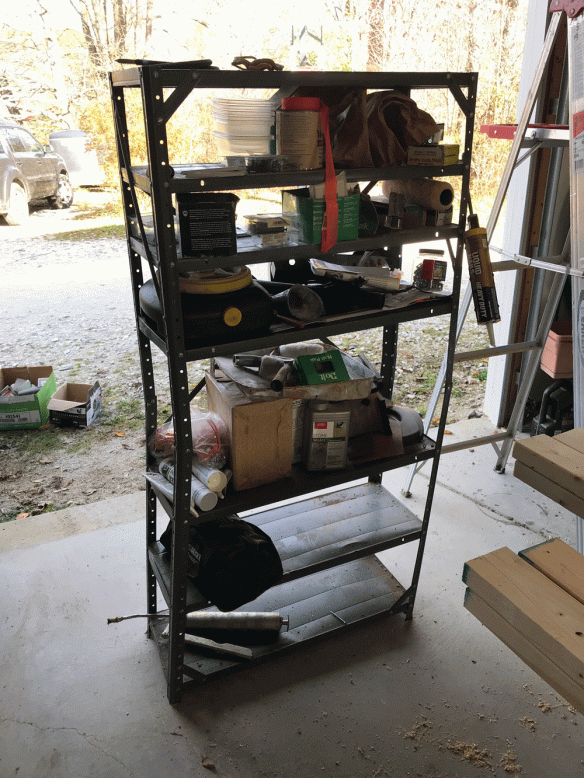
This shelf has served me well for over 18 years but maybe it’s just time, you know.

I modeled up and drew plans for the secondary work bench on the far left in the rendering, and the larger “L” shaped work bench on the far right. Budget wise the cost for lumber and screws to make these two came out to about $250 total including delivery of the wood to my place.

I put 1/2″ OSB on the shelves, and 3/4″ pine plywood on the work bench countertops. The countertops are all at 36″ height from the floor. I spaced the lower shelves to accommodate my plethora of plastic tool cases I’ve collected over the years. I ran 2×4 supports from the floor to under the loft rim joist as an added measure of support for the loft above. I’ll connect these supports with “L” brackets at the top and bottom. I screwed the shelves and countertops not only to the supports but also the wall where I could. Everything seems very solid. The “L” shaped workbench does not have a center support, but I think it’ll be strong enough as is (look at the photos). I wanted that corner open and easily accessible.

It took me one day to build and install everything. I think it works and looks great. I have counter space for my bandsaw, drill press, sander and other tools. And something neat: I finally unboxed a scroll saw we bought 18 years ago at Sears which has been sitting in a box because we never had space for it. I did lose some small shelf space, but I plan on installing pegboard and smaller shelves or cozies for small items and fluid bottles.

unboxing scroll saw

I finally got to unbox the scroll saw after picking it up on sale at Sears 18 years ago!

Garage Loft Support

Earlier this month I noticed the 4×4 post near the center of the loft was bowed in two directions. Could there really be that much weight up there? As you may remember, we built the loft back in October. So here we are in May, five months later and now the post is bowing.

I was worried the whole thing would come down, so I had a friend come over and help me unload some bins I had stored on the loft. We installed a temporary 4×4 to help support the bowed post.

This past weekend I was able to run up to Lowe’s and drop about $50-$75 on some lumber, brackets and construction adhesive. The plan I made was to install two wing walls at each end of the loft. Each would provide 24″ of support under the LVL header. These wing walls will basically disappear once I complete all of my wood shelves I want to build along the perimeter of the garage. The primary part of my plan though would be two 4×4 supports in the middle of the loft. These two posts would be 3′ apart, leaving 9′ of open span to each side to the next 4×4 post against each wall.

I built the 2×4 wing walls on my saw horses and installed them. Under the bottom plates I used construction adhesive, then secured the plates with concrete fastening screws. I screwed the wing walls to the existing 4×4 posts that support the loft where it meets the walls. And lastly I screwed the top plate to the underside of the LVL.

In the center of the loft area I placed a 3′ bottom plate on the cement and a top plate on the underside of the LVL. Between the plates I inserted two 4×4 posts. I secured everything to each other, using metal brackets to help reinforce the 4×4 to plate connection.

I don’t think these new supports will hinder access to a parked car. I can’t imagine the loft is going anywhere now.

What I really believe is the single 4×4 post just warped as it dried out. I don’t think there was any danger of the loft collapsing, but it was scary at first until I could really assess the situation and reinforce it.

Pictures below. Enjoy.

Garage Storage Planning

Now that I have the storage loft in the garage, here comes the fun part. I’m starting to plan out the storage shelves and “counter tops” I’m going to build for the back wall and work shop area.

Construction will be 2×4’s mostly, just like the work bench / spray booth I created in the basement. 

I still have to measure the area and inventory what I want to store, and what I want to use the spaces for, but that didn’t stop me from starting to sketch out my ideas on what I envision it looking like.

Once I have a plan I can work up a lumber list and see what the cost will be. I’m hoping to do this this fall or winter because I’m chomping at the bit. I really enjoy working on this type of project. And of course the organization will be awesome and mind-easing too.

-Chris

work-shop-elevation

Concept sketch of the work shop elevation.

garage-sketch

Garage Loft Day

I’m really happy with what I accomplished today, with a little (a lot of) help. Today was “Garage Loft Day” and the garage loft is complete!

Cost was right around a thousand dollars, and took two people (my brother and I) five hours to complete start to finish. It’s about 7′ x 21′ in size. All the framing is 2×8’s except for a 9-1/4″ LVL header across the open end of the loft.

We started out by chalking a level line on all three walls. Then we located the wall studs and transferred those measurements to the main long rim joist. With the joist on saw horses we installed metal joist hangers and predrilled holes for our 3×5/8 Ledgerlok Screws. The Ledgerloks were used to attached the long rim joist to the studs. We also used them to fasten the two LVL’s together. After everything was marked we installed the long rim joist against the wall studs.

Next we installed the first two floor joists, the ones that go against the short run against the wall. We used a blind joist hanger at the one end and a couple Ledgerlok’s at the other end to secure these shorter rim joists. They only need to bear the weight above them, not the whole assembly so no need to lag them into every stud.

With the LVL on the  saw horses we attached the remainder of the joist hangers to the board. A blind joist hanger at each end. The LVL was then lifted up and secured to the shorter rim joists with nails and ultimately a pair of lag bolts at each end.

To support the LVL header we installed three pressure treated 4×4 posts. Each post rests on a metal bracket that was mounted to the cement floor using 1/4 x 2-1/4 tapcon bolts. A 3/16″ x 4-1/2″ tapcon bit was used to drill the holes.

Once all the framing was complete we installed treated 5/4 boards, 12′ and 16′ lengths minimized the number of joints we had to deal with. We used #8 x 2″ deck screws to fasten the floor boards. The boards will shrink creating gaps between them which will help when I go to sweep the floor up there, allowing debris to fall through the cracks.

I’m very excited to have completed this project. It give us an “attic” that is easily accessible via a ladder. The loft has great capacity for holiday decoration and flea market bins, as well as other items that we don’t need that ofter, or can’t bear to get rid of. Looking at you original Jeep rims, when I say this.

The next project will be to design and build storage shelves along the back wall, as well as work benches and shelves for my shop below the loft.

Check out the photos below to the various steps in pictures.

-C