Basement is Done (Almost)

It’s been a while but most of the basement is finally done. Or at least done “enough”. We had a birthday party the other weekend at our house for our son, and the main behind the scenes star was going to be the basement. With seven kids plus adults coming over, we needed the indoor entertaining space done, or at least presentable enough to utilize for the party.

My brother and I busted our backs getting the tile in, and trim on. I fell short of grouting the tile, and painting the trim, but overall everything looked great and we were able to use the space without a hitch.

I was exhausted for days afterwards. More so than I’ve ever been in a very long time. But it was well worth the effort. Even in its unfinished state, the basement space looks fantastic. It’s like having a whole new house. And the possibilities are endless. At the very least we can finally start unpacking and going through everything that is in the basement. We can set out some furniture from the old house, that has been taking up space and collecting dust. I am looking forward to it.

Here are my notes and photos from wrapping up this phase of the basement project. I still have to do my office space (in addition to putting the finishing touches on the main part  of the basement). I have all the materials, I just need to find the time and energy to tackle that part.

Notes:

  • I hate tiling. I shouldn’t say I hate it, but I suck at it in one regard: cutting tile. I was cutting with a tool that scores the tile then breaks it cleanly in a straight line. Problem is I couldn’t use the tool very well. I went through $5 tiles like they were potato chips – cracking them and rendering them useless. I bet I wasted close to $500 in tile because I suck at cutting tile. I wonder how much it would have cost to hire a professional…
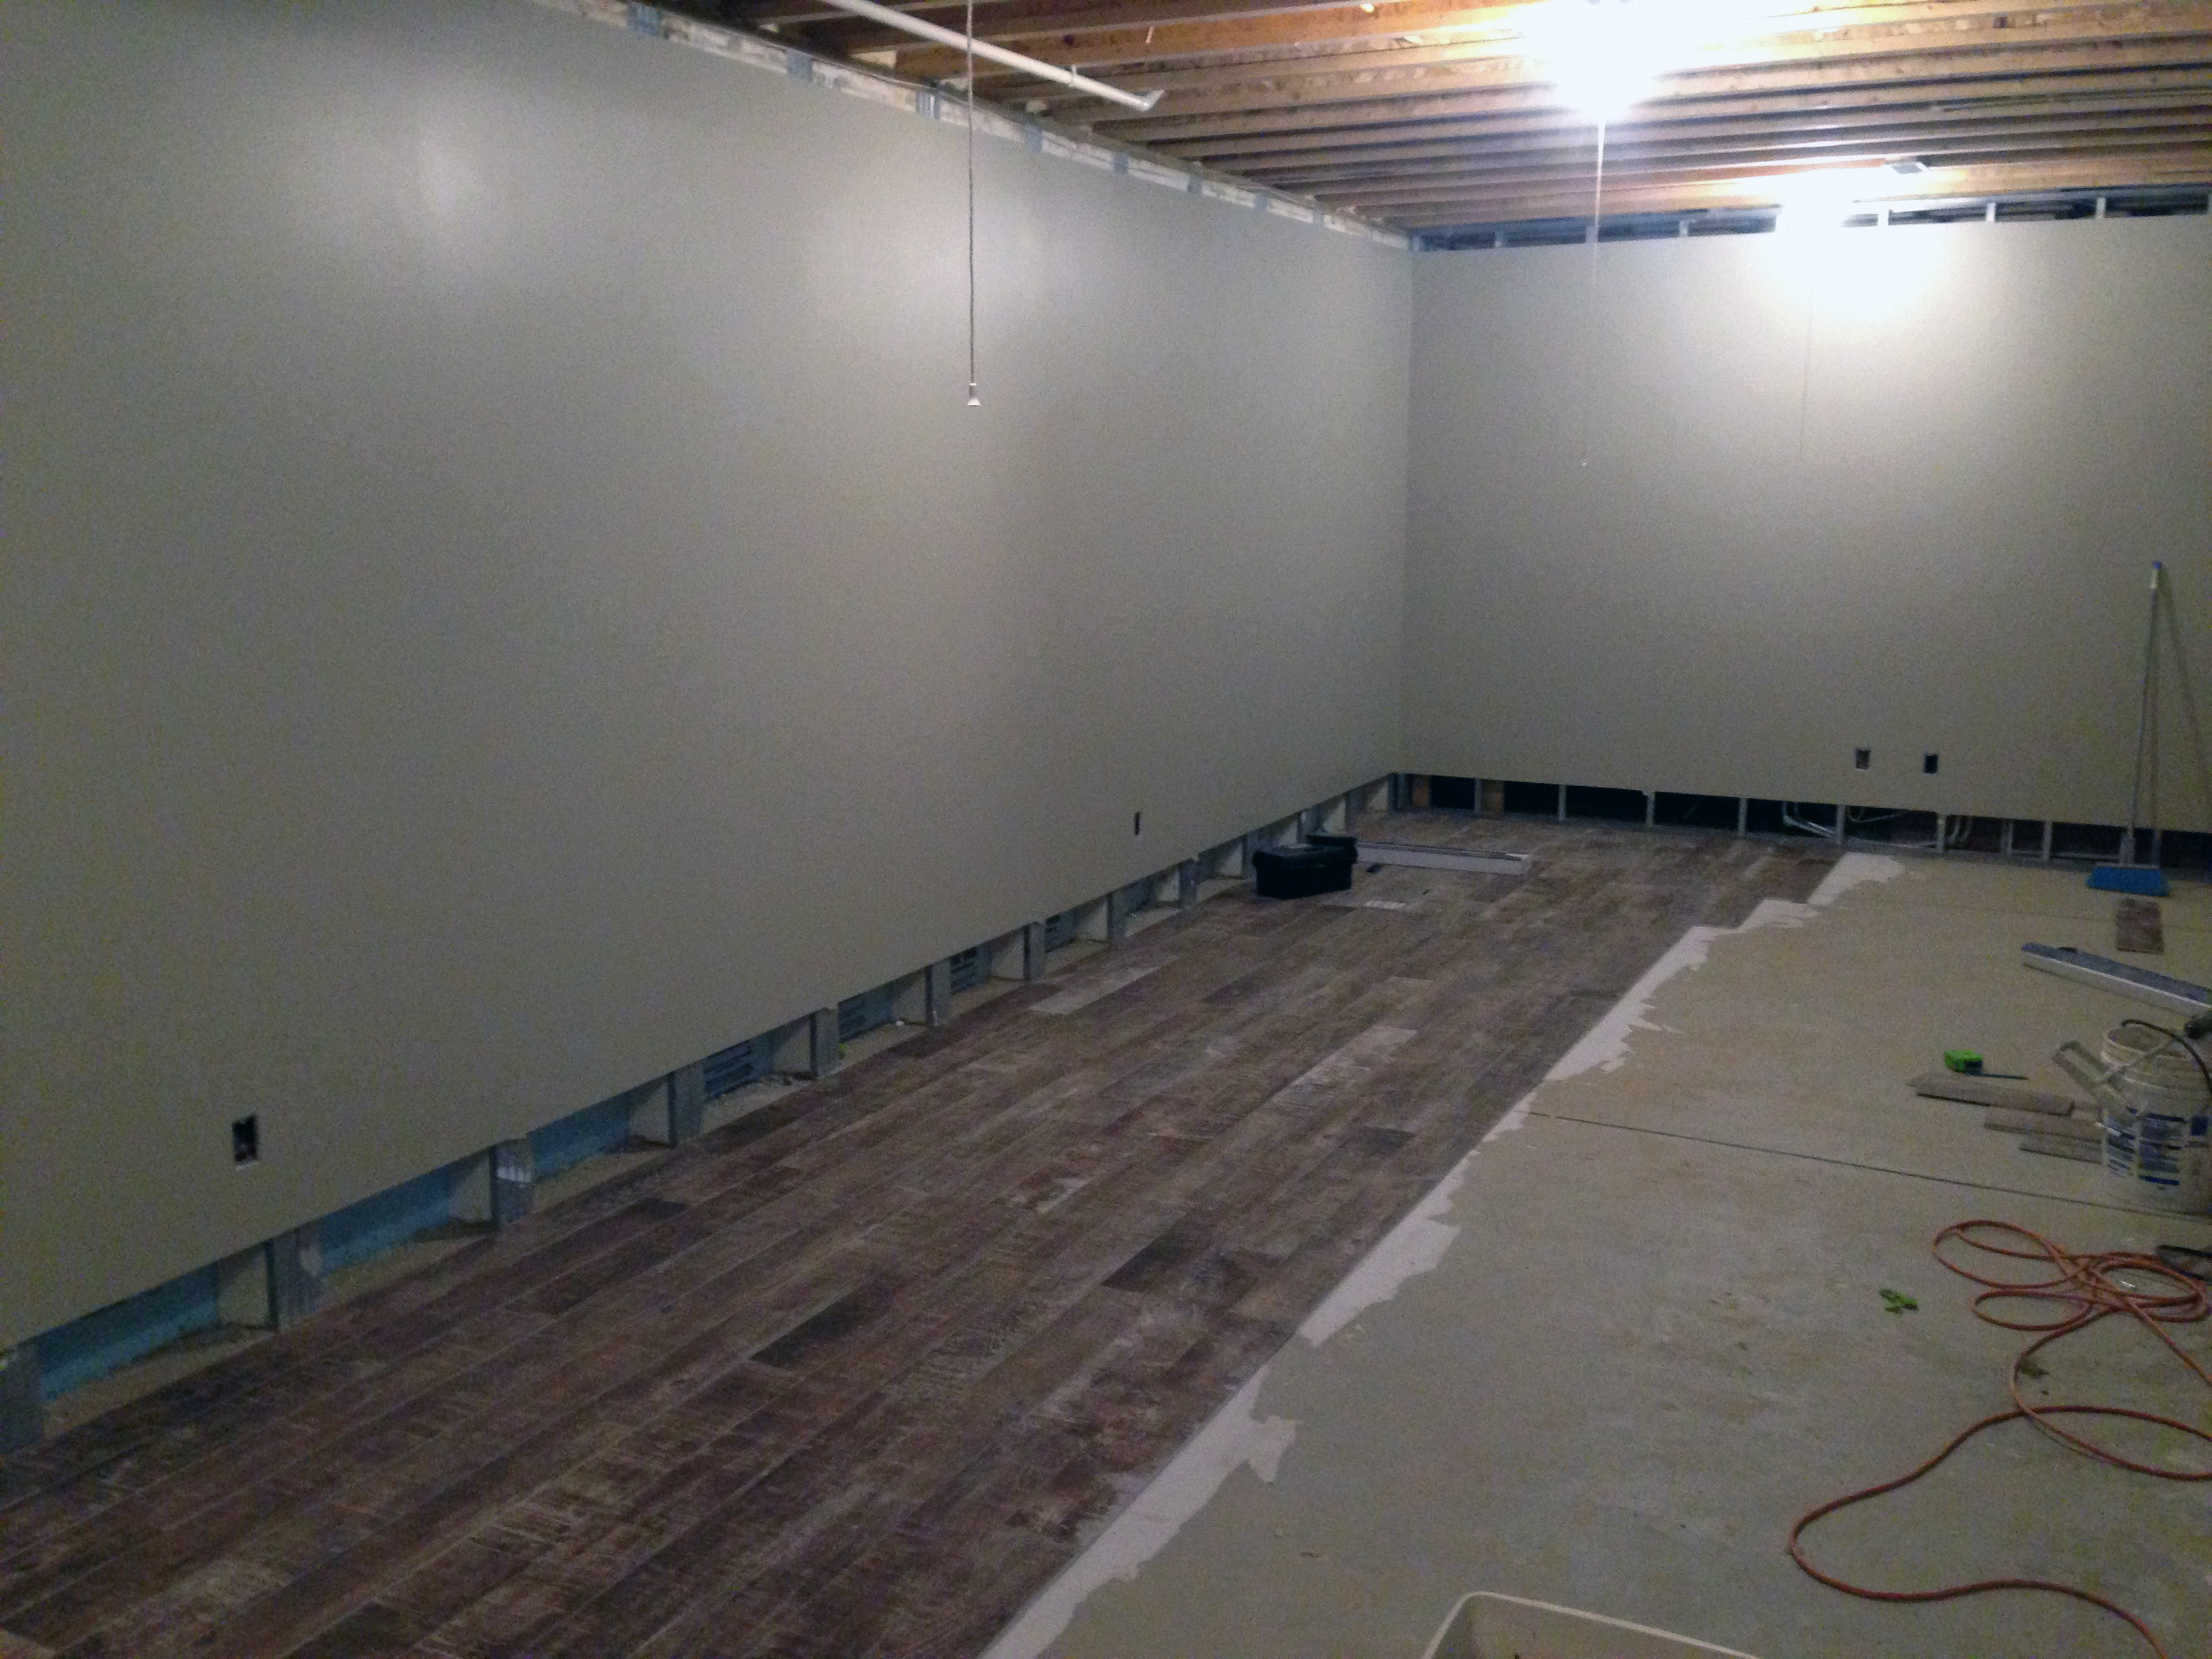
  • We went with 1×10 baseboards so that if the basement floods, we only ruin the boards, not the drywall. To save money I went with pine instead of poplar. I’ll have to fill in or smooth all of the knots in the wood, and then prime it…so definitely more labor on my part, but the cost was 1/4th of poplar or ripping down plywood
  • To mount the baseboards to the steel framing of the basement, I ripped down 1/2″ thick blocks and mounted them using low profile trim screws. I primed the treated wood blocks, to add a layer of moisture protection. Not sure if that was necessary, but hey, it couldn’t hurt.
  • The tile looks great. Most people assume it is real hardwood. Don’t be absurd. It’s porcelain tile, silly.
  • I found a great, simple circle mirror at IKEA. It looks great in the bathroom. I love shopping at IKEA.
  • The ceiling will be installed at some later date in the future. There was the suggestion that we simply spray paint the ceiling grey to give it an industrial vibe, while saving money.
  • I suck at drywalling. I had a piece of drywall I had to put in after the plumber moved the shower head. I tried to mud and tape it, and it was a complete disaster. So I called my drywall guy and he came out and rectified the situation in about ten minutes. I don’t know why I try to be handy. I’m not very handy at all. No patience.
  • I really hope I have enough tile – I think I counted right. Because with my luck they’ll discontinue the stuff before I’m done with the office. I went out and picked up six more boxes, which I think will be enough. Fingers crossed.

Basement Progress

We started tiling the basement floor. And today the electrician started to finish up the electrical work. All of the switches and outlets are installed in the main room and bathroom. As well as a couple of light fixtures and a bathroom fan.

It’s impossible to take good photos of lights with my phone, but you can generally see what they look like in today’s photos.

The tile is going to take a long time install. This is most of a day's worth of labor.

The tile is going to take a long time install. This is most of a day’s worth of labor.

The bathroom light we bought at Home Depot.

The bathroom light we bought at Home Depot.

The caged wall sconce we bought from Restoration Hardware.

The caged wall sconce we bought from Restoration Hardware.

My Home Interior Paint Selection Tips

Basement Progress

With the basement drywall complete, the next logical step is painting of course.

I usually paint walls after we “move in” so to speak – after the flooring and trim is in. But in this case, if I paint now, I don’t have to mask anything off and don’t have to worry about drop cloths covering the flooring. Without the tile or trim installed, now is the time to make painting an easier chore. I am assuming though that I will have to touch up a few things after the trim is in but otherwise I going with the plan that this will save me some time and effort.

I took advantage of a 40% off sale at Sherwin Williams this weekend and picked up all of our paint and primer for the basement. Total cost, including a couple of sundry items, was around $400. My labor is free.

I thought the project would take a weekend, but here we are on day four, with at least one more day to go. The basement has over 2,000 square feet of paintable surfaces, not including the trim which will be painted white later when it’s installed.

It’s a relaxing project, and it makes me get some exercise so I don’t mind. I talk about colors and color selection later in this post.

Also exciting this week, I picked up all of our tile for the basement. It took two trips with our 4×6 trailer. 667 pieces of 6″ x 36″ porcelain tile total. It is amazing how much tile weighs when you have to move the boxes by hand. We lucked out in that each pallet of 252 pieces fit through the door of the enclosed trailer. The first load let me know that my trailer tires were pitifully under inflated. After unloading, I aired them up and returned for the second load. The excess boxes of 7 tiles apiece easy stacked in the back of the RAV4.

Now we just need to move all 95 boxes down to the basement from the garage. My back will be happy when this basement project is over.

Fingers crossed we can start laying tile in the next week or two.

My Paint Selection Tips For Your Home

As you may or may not know, we’ve chosen Sherwin Williams HGTV Global Spice palette as the general guide for our home decor. Nearly every wall color we’ve used is off of this palette. This has been our “Bible” so speak, but alarmingly Sherwin Williams dropped three colors and replaced them with three new ones.

Oh no! What the hell?!

It took me a while but I’ve come to terms with the new palette colors, which include a replacement for the Edamame (SW 7729) green that we painted the upstairs bathroom. Also Gallant Gold (SW 6391) is gone (we never used it), and Grandeur Plum (SW 6565) is of off the list (an awful for walls, purple color).

As a designer I like the idea that Sherwin Williams’ color experts have assembled a group of diverse colors that all work well with each other. This way I can spend my time painting, and being imaginative with which colors I want to use and how I want to use them.

We selected these colors from the Global Spice palette for the basement:

Cloudburst (SW 6487) for the bathroom (new blue color on the GS palette)

Loggia (SW 7506) which is a fantastic neutral tan, for the living area

Resort Tan (SW 7550), a dark mushroom color for my office (also used it in our living room upstairs)

Cavern Clay (SW 7701) for the storage cubby / play fort under the stairs (a deep earth tone that I’ve wanted to use for quite some time now)

I painted the entire basement with VOC free Harmony primer, and used top of the line VOC free Emerald paint for the walls in a satin finish

Wondering what to do color-wise for your next painting project? Here are my design tips:

  1. Pick A Palette – All paint suppliers have cards of colors that work well together. Pick what you like and go with it. We like earthy palettes because they seem more natural. But if historical or Mediterranean is your thing, go for it. Get something with a few colors from multiple color families – i.e. greens, browns, tans, reds, blues, etc.
  2. Try Monochrome or Tones – Often you can get paint chips on a card with 2-5 other colors that are various shades of the same color. Pick one color off of the card to be your main color, then select a color two shades darker or lighter to use as a compliment. In our last house we chose four colors off of the same card, and painted our kitchen, dinette, family room and fireplace alcove in the order the colors were on the card, lightest to darkest. It created a wonderful color changing graduation across a huge open space. The changing light throughout the day and evening made for a subtle yet interesting effect.
  3. Use Earth Tones Instead of Beige Everywhere – I feel strongly that every room should be a different color, even if the changes are subtle. There is an infinite palette of really nice earth tones that can be used instead of painting everything white, off-white or beige. Infuse subtle yellows, browns, rust reds, sage and plum into your color scheme. Earth tones are natural, inspired by nature and never go out of style
  4. Include Unexpected Touches – Highlight your home color scheme by painting a room or even just a wall with a bold color from your palette. Bathrooms or small bedrooms are a great opportunity for a fun color (or even wall paper) to create some interest in the home. In large rooms I love to paint one wall a contrasting color, or a different tone of color. The front wall of our home is a subtle yellow tone, that is found nowhere else and travels across three other rooms, each painted their own complimentary color
  5. Paint A Few Ceilings – There is no reason all of your ceilings should be white. Hopefully you have a “knockdown” texture on your ceiling or better yet, have no texture on your ceiling and then paint it. That yellow color on the front wall of our home? It carry’s over onto the kitchen ceiling to define that space in an otherwise open floor plan. In the bathroom downstairs, the ceiling and walls are all an earthy blue color. Painted ceilings help cocoon you and make you feel at home
  6. Consistent Trim – I happen to prefer the pure line that wide, simple profile white trim brings to the story of your home color scheme. It helps separate color spaces; floor and wall. And it’s universal – goes with everything. For an earthier look, try an off-white or medium toned trim color. But  I feel like the whole house should use one trim color and go with it. Don’t mix and match trim colors. It’ll just look disjointed.
  7. Don’t Use Purple – Actually I feel like you should be able to use whatever color you like, but I just don’t like bright purples (or other bright colors) for walls; other than the occasional unexpected touch. I prefer a neutral, earthy look and feel for the walls. Then add in pops of color with your furniture and accessories. Earth tones give you a huge array of decor possibilities. A color like purple means you’ll be stuck neutralizing it with boring tan furniture, instead of the other way around. I’d rather the background, which is what the walls are, is more subtle. Then the items in the room can be where the interest is at. Save the purple, bright blues, retina burning reds or acid greens for your couch, accessories or pillows.
  8. Go Dark – Don’t be afraid to paint an entryway, family room or other space a dark color. Colors like SW Plum Brown (SW6273) , Sable (SW 6083) , and Sealskin (SW 7675) are great colors for transitional spaces. Our basement is actually a few darker colors. You’d think that would be counterintuitive, but dark colors embrace you and can make wide monotonous spaces smaller. The darkness can be offset with white ceilings, and lighter furniture and accessories. The only down side is that you’ll likely need 2-3 coats of paint to get the look you want.

Basement Update – Drywall

The basement has drywall! Happiness.

Once completed this will be our first finished basement as a family. In fact, the wife’s never really ever lived in a house with a finished basement. So getting the drywall installed is a big step towards that goal.

The space actually doesn’t look all that different, or at least not as different as I expected. It does look good though. You can get a feel for the large rooms down there. And as you look at the photos you can see how we left the sheet rock up about 8″ to mitigate against any potential future basement flooding. We’ll cover that gap with replaceable plywood baseboards that can be removed in event of water pooling in the basement as a result of sump pump issues.

I didn’t install the drywall myself, rather we contracted that out. It took about a week for one person to hang, tape, mud and sand. It installed with no problem onto our Superior Walls foundation, and the metal stud partitions I raised.

To a certain extent, installing sheet rock on the foundation walls, along with caulked baseboards, should insulate the basement even more, and make for a tighter envelop on our home. Maybe once the basement is complete, and I do a few other things (all LED light bulbs for example), I will have the house re-evaluated for energy efficiency and see if we’ve improved our HERS score.

Take a look at the photos and captions for more on the drywall.

Next up will be painting all the walls. We’re going to do this next because with the floor being bare cement, we won’t have to worry about paint spills. We can get at least a coat or two on the walls, then touch up later if necessary.

Speaking of the floors, we have tile on order from Lowe’s. We went with a distressed wood look porcelain tile, which is very trendy right now. The 6″ x 36″ tile is called ‘Sequoia Ballpark Tile’, and it is $2.99 a sq. ft. which is a bit pricey. In our search we did come across tiles that are upwards of $10 a sq. ft., so everything is relative. We like the look and will save some cash by installing it ourselves. We’ll cover all 948 square feet of the basement with the tile. This will give us a nice looking floor that will be impervious to any flooding or moisture in the basement. The distressed look, with brown, white and grey tones should be timeless aesthetically, and congruent with the style of the rest of our home.

It’s very exciting to well on our way to finally having a finished basement space for work and play. This will accomplish a major house goal for us. One that has been around for over fifteen years really.

Basement Update

Tonight a quick update on the basement project. We actually have not done much since I last wrote about the electrical in June. Everything passed inspection so far – electrical, framing, insulation. Next up is drywall.

I decided that I would just hire a drywall contractor to do the basement drywall. My time is better spent working, and a contractor is going to do a better job than me anyway.

Because the house is done, there’s no way to get really long 12′ sheets of drywall into the basement so we’re using 4’x8′ sheets. We’re using USB Ultralight weight 1/2″ sheets. 58 regular white ones, and 8 green mold resistant green ones for our 900′ square foot basement. Cost was around $700 for materials and truck rental.

Our ceilings in the basement are 9′, but we’ll lose some height with the drop ceiling. To make up the rest of the difference between the ceiling height and the 8′ tall sheets, we’re going to install 10″ tall baseboard trim.

We are worried about flooding in the basement, if the sump pump ever failed during a storm. We were originally going to install cement board on the lower foot so that if the basement flooded, we wouldn’t have to rip out the drywall. Well our drywall contractor came up with a better idea. We’ll paint the baseboard all around, front and back, to create a water-resistant seal. The baseboard will then cover up the bottom 8″ below the where the drywall ends. We’ll fir it out a 1/2″ so the baseboard overlaps the drywall. Then if it ever gets wet down there we can simply unscrew the baseboard and throw it out if it’s ruined, or remove it before it gets too wet. I need to talk to my trim carpenter to see if using MDF or hardwood is preferred for the baseboard.

Detail of how I'll finish the basement walls

Detail of how I’ll finish the basement walls

It should be a pretty neat trick. And the tall baseboard will fit in with the contemporary feel of the rest of the house.

I went to Home Depot and picked up the drywall material. I was able to rent their truck and get it unloaded in an hour.

Next week we start installing drywall so I’ll share more updates then.

My rental truck with all our drywall loaded and ready to go home.

My rental truck with all our drywall loaded and ready to go home.

Finished Basement Update – Electrical

I wanted to share with you some pictures from our basement finishing project. After sitting idle for several months, work has picked up again on the basement. We’re in no rush to get it done, but it would be nice to have it ready by later 2015, fall or early winter.

After completing, and getting approval for the rough framing that yours truly completed, it was time to get the electrician in. I can not do electrical work. It scares me, and as prone as I am to making mistakes, I’d likely burn the house down and kill myself.

The electrical will be completed in two phases. Right now is phase one, the rough-in. After this is approved by the building department, then we’ll cover everything up with drywall, and then the electrician can do his final electrical work.

The install should take three working days total for one electrician. All seems to be going well. Basically a bunch of electrical boxes and yellow wires everywhere.

The Superior Wall System we used for our foundation makes wiring outside walls a breeze. There are little holes for wires to pass through on every cement stud of the foundation. Electrical boxes mount easily to the metal studs of the foundation, and my partition walls, with self tapping screws. Note, if you have Superior Walls, have your contractor check out their website. There is a lot of info on there for contractors regarding how to work with the wall system.

Superior Walls make life easier for insulators, electricians and even plumbers by virtue of their thoughtful, feature filled design. Any house I ever build will utilize this wall system for the foundation, if possible.

I went over the switch and lighting layout with our electrical contractor. I think the wife and I have it all figured out…designed…as best we can tell, in terms of where we want lights and how we want everything to be switched on and off. I’m having the electrician put in a CAT5? cable into what will be my “office” space. Not sure in this day of wireless communication how important this is, but I guess better to have it than not.

There is pretty good access, even after the drywall is up, to many of the walls and all the rooms, especially because of the drop ceiling that we plan on installing. So I’m not to worried if we screw something up and have to “fix” it later.

Electrical should be done this week. Then we can order drywall and start that phase.

Wires simply pass through the remade holes in the Superior Wall studs of our foundation.

Wires simply pass through the remade holes in the Superior Wall studs of our foundation.

Electrical boxes simply attach to the metal studs of the Superior Walls of our fondation.

Electrical boxes simply attach to the metal studs of the Superior Walls of our fondation.

A typical plastic grommet bushing (the red thing) in the metal studs. This protects the wires from chaffing or cutting on the sharp metal.

A typical plastic grommet bushing (the red thing) in the metal studs. This protects the wires from chaffing or cutting on the sharp metal.

Valentine’s Day

Valentine’s Day Present

Most guys would get their sweetheart roses, a card and maybe some chocolates. I bought my wife one-hundred-eight dollars worth of straw bales for Valentine’s Day.

The winter has been everything the Farmer’s Almanac had predicted, and more so. We’ve been snow-covered since Christmas for intents and purposes. And this week the bottom finally fell out of the thermometer; treating northeast Ohio to windchill lows in the -20 to -30 range. As Valentine’s Day dawned we were greeted with winter storm warnings, and cancelled travel plans.

The nagging worry about our bees, that had been omnipresent in the back of our minds, worked its way forward with the arctic weather looming. We decided to put up the burlap wind break that we had neglected to erect before winter. But we wondered if there was more we could do. I’m not sure who thought of what, but I googled “hay” and “beehives” and sure enough found examples of straw bale wind breaks around beehives.

The last thing I wanted to do was go buy a bunch of straw bales and haul them back to the apiary. But it was Valentine’s Day and suppose that’s what you do when you try to be more good, than bad.

With the suspicion that carrying bales of straw out back would be the end of me, visions of a heart attack leaving me face down in a blanket of snow, I reluctantly put on my long underwear, boots, scarf, coat, hat and gloves. Outside I went. I hooked up the trailer and headed down to our local hardware store / lumber yard. Once there, I bought as many bales as I could haul.

Sure enough, back at the ranch, after carrying two bales back I was ready to welcome the relief of a good life-ending cardiac event. That’s when my Valentine came out and had the great idea of using a sled to haul the straw back there. It worked brilliantly with the two of us, and our trusty sled, moving ten more bales back to our beehives.

I stacked the bales as best I could to get as much coverage around the three hives. We also put up the burlap wind break around the southwest corner, which is the corner most exposed to the prevailing wind. I also pushed some snow under the hives; the intent being that it’ll keep the wind our from under the hive. The top of the hives have a decent three inches of the white stuff to help insulate as well.

We’ll see. I’m not even sure if hive No. 1 is still alive. So maybe we could have allocated resources to the other two hives. There’s no way to tell so we just did the best we could do.

With that, I’m writing off the “straw bale for bees” thing as my Valentine’s Day present to my wife this year. And I didn’t even have a heart attack.

Snow Guard Repair

Elsewhere our friends at First Choice Exteriors came out and fixed the snow guard on the garage. They were out on Monday and fixed things right quick at no cost to us. If you have a need for a metal roof or metal roof accessories, these are the guys to call. They are courteous, and do great work; which they stand behind. They service northern Ohio, and I think they even trek out to Indiana, West Virginia and Pennsylvania. Highly recommend them.

Basement Update

I finished farming the basement today! Only took me 6 months. I still have 3 metal studs to install but I’m leaving them out until we get EVERYTHING in to the storage room. Next we’ll get the framing and insulation inspected and the have the electrician come out to do his thing.

Today I completed the framing for a little storage cubicle under the staircase. That area, while good for storing Christmas decorations, it also makes for a good “fort” too.

Here are today’s photos. Stay warm peeps.

Basement Planning and Pricing

Before we jump into all the “fun” work I’ve been doing in the basement for the last six weeks, let’s do a post to go over our game plan.

Budget is the biggest driver for the project. We have zero money frankly, but as I said in the last post: we feel strongly that we need the space to be useful, otherwise what’s the point. Before the project the basement was full, no exaggeration, of “stuff”. Furniture, half filled boxes, years worth of stuff that had just been moved from house to house. For example, in our old house we had a library filled with books. There’s nothing like that in the new house, so there are just box after box of books. My wife collects board games and we’ve never once had a place to store and display her very extensive collection. I have every car magazine from 1986 to the early 2000’s. Yes, those can be recycled but I’d like to go through them first. Point is we have more crap than most of you combined.

The basement has to stop being a big catch-all.

Okay, back to design and our plans. Here are the main project areas. I’ll go over them in detail in subsequent posts.

Exterior Walls

When we built the house, you may recall we used Superior Walls for our foundation. The basement walls are prefabricated out of cement and steel, and stand nine feet tall (9′). The walls feature metal stud facings so we can apply drywall directly to the face of them. No need to fir out the walls which saves a lot of time and money. I just need to frame in a few of the corners with drywall nailers. Note, we would also have to frame in for any shelf or cabinet supports ahead of time. Superior walls cannot support a vertical load so don’t go screwing in cabinets into the studs. More info, and to see nailer diagrams, click here.

Insulation

The foundation walls are insulated to R12.5 from that factory with blue rigid insulation. When we installed them I speculated that we would insulate them with another R-20 worth of insulation, which I think is the maximum if we fill the rest of each cavity with sprayed insulation. Well to keep costs down we did two things 1) only insulated the top 4′ of the exterior walls and 2) went to a depth of 1.5″ (R-10). Why? The top half of the wall has the most exposure to outside temperature changes. Once you get beyond 4-5 feet the earth’s temperature is pretty stagnate, something like a constant 50 degrees or something (I’ll let you look it up). By the way, cost to insulate the top 4′ with 1.5″ of 2 lb. spray insulation (R-10): $2,164. Three inches (R-20) would have been $4,040.

Floors

The floors in the basement are cement (over 4″ of rigid foam insulation by the way). Our basement is prone to flooding if the sump pump ever fails, so that drives many of the design decisions we’ve made in regards to our basement project. Long term our plan would be to cover the entire 950 sq. ft. of living space with ceramic or porcelain tile. Short term though we’ll leave it cement. I’ll rent a floor cleaner from Home Depot and clean the cement myself. Not sure if I’ll seal it at this point. I’ll decide when the time comes. We could stain the floor like we did in my studio. That is always an option, in lieu of putting tile down. For now though regular concrete will suffice everywhere, though the bathroom will likely get tile right out of the gate. Cost should just be a few hundred dollars for cleaning and any tile.

Ceiling

There is some debate whether to put in a drywall ceiling or suspended ceiling. Drywall is cleaner and more finished. Suspended ceilings give you access to HVAC, water and electrical. If you think about it, the other floors of the house are covered in drywall with no utility access. So I think drywall is a fine choice. The problem with our ceiling is there are a lot of pipes, ducts and other obstacles that I don’t want to, or can’t, soffit around. We’ll be putting a drop ceiling in all the living areas except the bathroom. Armstrong has a wide selection of ceiling tiles and a lot of inspiration shots on their website. I got a quote for installing a generic Armstrong system: $3,500. I’ll do it myself. Hopefully the material cost will be closer to $1,000-$2,000. We may hold off and do this next year if we can’t afford it.

The yellow areas will likely be drop ceiling.

The yellow areas will likely be drop ceiling.

Interior Wall Framing

Because of the potential for water flooding should the sump pump fail, I was hesitant to use wood framing. If the basement flooded there’s potential for mold to grow in water-logged studs and walls. Regardless always put down pressure treated sole plates, but I didn’t feel like using treated studs. I was curious about metal framing so that’s what I went with. I still used wood for soffits, blocking and ceiling areas. Look for my thoughts on metal framing in a future post. Cost wise we got an estimate for $1,791 to have someone else do the framing. I did it myself, learned a new skill and spent about $750 on materials to partition the basement. By the way, this includes material for desperately needed storage shelves in the storage room.

Electrical

I don’t do electrical so we’ll have to hire a pro. We’re doing the bare minimum. With the drop ceiling and good access from the storage room we can add-on later. For now it’s all switches, outlets, and ceiling cans. I’d like to swing for 4″ cans but may just default to 6″ to save money. Would like to populate them all with LED bulbs though. Cost estimate for electrical parts and labor is at $4,000. Yikes!

Walls

We’ll drywall everything. I may put 12″ of cement board at the bottom of every wall because of the aforementioned water damage potential. Or not. Estimate we got was $3,757. Doing it myself will hopefully save some money. But I don’t have the patience or craftsmanship (or desire) to mud it all so I may have to source that.

$4K electric, $2K insulation, $1K framing, $3K drywall = $10K, then do the ceiling next year or down the road maybe. We’ll see. I just hand over receipts and the wife keeps track and cuts checks.

Stay tuned for future posts on each step of the way. As of this writing I’m wrapping up framing and the insulation is done.

-Chris


Our Fall 2014 Project

Things have been quiet indoors this year. Most of the activity around the ranch has centered around the bees, and maintenance type chores. Inside we’ve been going about our business of living in the house. But, as I mentioned in previous posts, we’ve got an indoor project going on this fall.

With kids, cats and us all bouncing into each other, the house is nothing short of a disaster on a daily basis. Tripping over toys and debris is a daily sore point for me. As is trying to get a semblance of privacy to work my home based business without interruption. Finally enough was enough. With all the studios, bedrooms, and whatever rooms basically decorated, or at least decorated as much as they will be anytime soon, there is one last major frontier to tackle inside: the basement.

I drew up a floor plan on the computer in October and secured a permit from our local building department. Once completed to plan, the finished space will add 950 square feet of living space to the house. The added usable space will feature an office area for me. Working in my studio just is proving to be a bit too disruptive during the course of the day. I’m not 100% sure I’ll move downstairs but it does provide that option. The other major space will be an open entertainment area which is our primary reason for doing the project now. We need a place where we can dump the children and their toys. A cluttered family room upstairs grates on my nerves. I’m tired of stepping over stuff.

Connecting the two spaces is a hallway and bathroom. The bathroom is already roughed in and the shower is already there. A large portion of the basement will be partitioned off to be a storage room as well.

We did not want to wait to finish the basement. If we waited, I know what would happen: there would never be a good time. We’d never have the money. The kids would be in college and then why bother. So keeping costs down is paramount. This will be our first finished basement since we’ve been a family.

Our budget for the project is $10,000. We don’t really have a due date but hope to be mostly done by Christmas this year.

Basement plan

Basement plan

I am (will be) doing most of the work myself, single-handedly. The intent is to save as much money as possible, so I’ll do everything I can do myself. Hopefully limiting costs to materials or those tasks I just cannot, or choose not to do such as electrical work (which I can’t do).

The plan is to get the basement done to the point where kids can go down there and play. We’ll have a finished bathroom and painted drywall on the walls. The ceiling will be a suspended ceiling and that should be in place. Floor-wise we’ll stick with the cement, but I’ll rent a cleaner and give it a good washing before the project is done.

Stay tuned for future posts as I walk you through the project, sharing what I learned, what works and what doesn’t work.

What projects are you working on this fall and winter?

Have you finished your basement?

Anything you’d do differently?

Share in the comments below.