Tar and Feather

I awoke to a relatively meager 3″ of snow on the ground this morning.  After some running around with kids and wife dropping off the car at the repair shop, I hopped in the Jeep; throwing the half bath vanity and the replacement light pharmacy sconce for the master bedroom inside before boarding.

As luck would have it Tony and my brother were freezing their asses off installing the porch columns that I would have had to help install, were I not so tardy this fine Saturday morning.  Approaching the house, after proudly parking the Jeep in front of my studio, I noticed all the breezeway columns were installed.  It appeared that the threaded bolts in the cement footers lined up fairly well with the corresponding headers running the length of the breezeway, from house to garage.  We used simple pressure treated 4×4’s for the columns or posts.  Each will be trimmed out in cedar to give the look of a 10×10 or 12×12 column.  By trimming the narrow dimension posts with large dimension “one by” cedar, we’ll be able to camouflage any inconsistencies or misalignment in the posts.

After a brief joke about letting all the hot air out of the house (the porch door was cracked open to allow hoses and cords outside) to the guys installing posts in the screen porch area, I stepped back inside; relieved that I’d missed that task.  Asking my other brother what I could do he mentioned I could work on the couple of items I’d mentioned the other day.  One was replacing the attic window panes with tempered panes.  A mis-measurement long ago lead to non-tempered panes being installed.  These would have to be fixed before we move in, otherwise the windows would need unsightly railings in front of them.  The other task was to investigate the draft mentioned by my brother.  He had experienced it coming from under the fireplace when they were installing the hardwood flooring.

Laying down some cardboard on the wood floor I got down on my belly and peered into the 8″ tall gun slit below the fireplace. Sure enough I could feel cold air.  And not just a little, actually quite a bit.  I was a fair bit alarmed because the whole premise of the house was that it was air tight and super insulated.  We had identified some problem areas when we did the blower test but the fireplace wasn’t really one of them from what I remember.  I reached into the cavity below the fireplace.  Quickly, for reference, the fireplace unit sits on a cement board and 2×4 platform about 8″ off the first floor deck.  The back of the fireplace juts out into the screen porch several inches.  You may remember, Eric and I built a 2×6 plywood box (or chase) to house everything.  The exterior of the chase has house wrap, 4″ rigid and cedar siding.  The inside has pink or blown insulation with a foil face for fire proofing. We insulated under the fireplace by installing pressure treated 2×10’s to form boxes, then we filled the boxes with 10″ of rigid insulation.  At the time I think we mentioned we should have installed the rigid horizontally, but alas we did 4″ blocks vertically.  We thought we had caulked everything up good.  apparently not, for as I stretched and dipped my hand I could feel a slight draft of cold air.

Slit near floor, below fireplace and to the left of Tony is where we had an air leak. It's about 8" which is just enough to make you think you can do productive work under there.


“Hmmmm…..okay here…..I can feel the draft here”, I think to myself.
Sure enough coming up between the seem in two of the vertically install blocks of, our friend, blue foam.  Mind you, at this point I’m belly down and up to my arm pit in fireplace goodness.  I’m clawing around at loose insulation, made from recycled newspaper, that had fallen down; grabbing handfuls and setting it aside.  I can taste the fiber like grit of insulation in my mouth.  Yummy. 
 
Then my hand reaches way back and the cheapo pink insulation feels cold….but not really, cause what it feels like is not cold but rather cold and wet……what the?  Slowly the fiber like dust settles enough and I gaze into the dark cave under my fireplace.  Scanning right to left I do a double take, not sure what I’m looking at.  At first I think its expanded foam shooting skyward from between the blue foam blocks.  It literally takes five to seven seconds for my brain to comprehend what I’m seeing.  In disbelief I force my hand to continue panning right to left and grip the, literally, ice-cold stalagmite protruding upward.
 
It’s a god damn upside down icicle in the middle of my house.
 
I think to myself, as a form of diversion, “which is it, stalactite or stalagmite?  Those things in caves?”
 
Seriously?!
 
Continuing in disbelief I think to myself “Enough of this” and I break the f-er off at the base.  Damn thing is easily four or five inches long. “How does an icicle even from upside down?”  I peer in again looking for its counterpart on the “ceiling” of the fireplace slit.  Nothing there.  Getting to my feet my mind races.
 
The whole philosophical foundation of this house was that it would be airtight, super insulated and energy-efficient.  And looking down in my hand I’m seeing just the opposite of everything we’ve done for seven months.  Imagine you went out and laid down money for a Lamborghini. On your way home you decide to open it up a bit on the freeway only to find that you’re being passed by mid-90’s Chevy Cavaliers.  You pull over, pop the carbon fiber hatch and find the automotive equivalent of a friggin’ upside down icicle in your engine bay. (Chris, they’re call stalagmites btw).
 
Are you f-ing kidding me?  I’m sweating to death cause the house is so hot everywhere else, yet it is cold enough to form an icicle in the open space under the fireplace.  It’s 70 degrees inside the house yet I can see my breath under the fireplace.
 

This was living under my fireplace inside my super tight insulated house. Trust me, the irony that it looks like a certain body part in my hand was not lost on me in the least. Very apropos all things considered. Basically the energy efficiency gods having a laugh at my expense.


As best I can tell, the air infiltrated our 2×10 box through a uncaulked seam.  The narrowness of the seam accelerated the super cold air.  As soon as that cold air hit the warmth of the house it condensed on contact and created a micro climate under the fireplace.  The insulation got damp and the area where the air penetration was built up this kick butt stalactite or stalagmite or whatever the heck it’s called.  I spent easily the next twenty minutes trying to figure out a fix.  Looking outside I could see there could be some improvement sealing out there but it’d have to wait til spring or summer.  Just too tight and cold to crawl under the deck today.
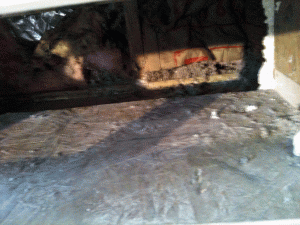
 

Fuzzy pic but you can see how tight it is under the fireplace. Just tall enough though to think you can be productive. Just short enough to eliminate any success at doing anything worthwhile.


I decided I’d cover the whole surface of the blue board with a cocktail of expanding and non-expanding foam.  On top of that I’d place a cement board panel.  I’d then caulk all the seams.  Running up to Terry Lumber I picked up the two types of spray foam.  I started with the non-expanding type, spraying the perimeter and dumping the rest of the can as best I could on top.  The close quarters made 80% of this work a guessing game.  Next I used most of a can of expanding foam, jamming the nozzle down into the cavity where the icicle was.  I had previously beat the base of the icicle to break up the ice as best I could.  The conditions were not optimal, temperature wise, according to the can but I couldn’t wait til July in Cleveland to do the job.  Once all the foam was down I squished my cement board panel down into the foam.  Securing the panel with screws or even a nail was impossible….believe me I tried.  So I held the panel in place with some cut 2×4’s, applying pressure between the panel and the fireplace “ceiling” above (the platform for the fireplace).  I then caulked all the seams I could see, including some that probably made no difference.  Into other voids I saw, I sprayed expanding foam to seal everything up real tight.  I then tossed the loose cellulose insulation back into the chase bays in the areas that the pink insulation was lacking.  The pink insulation was still a tad wet but I fluffed it up and it should dry out now.
 
Throughout the process I essentially rolled around in spray foam, caulk and cellulose insulation.  My hands looked like I made love to an unwilling bird.  Pulling the dried caulk from my fingers tested my hand’s ability to retain skin to flesh.  I’m pretty sure I inhaled enough chemicals and insulation to obliterate any hope of not dying of cancer. I basically, figuratively….slightly literally, tarred and feathered myself over the course of an hour.
 
It was not a text-book operation by any scope of the imagination, but I will say, our little cavity under the fireplace did start to warm up after a while.  And I couldn’t feel any direct cold air anymore.  After that was done we started to skin the fireplace with 1/2″ OSB.  Upon that will go chicken wire and our masonry stone.
 
Elsewhere in the house Eric is continuing to work on trimming out the doors.  The three panel doors look really nice in person.  Tony and I trimmed out the top of the master closet with 1/4″ luan plywood and some left over 1x scrap we had lying around. The coming week should include kitchen cabinets and baseboards starting to go in. 
 
‘Til next time, stay warm. 

Trimming closet top in 1/4" plywood


Using left over 1x2 rips to trim top of closet


Trimming out the interior of the porch door
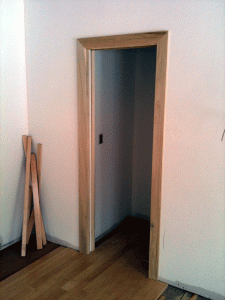


Pantry pocket door with trim.


If you're doing this at home, start with the top piece then do the sides. Our casing is about 3.5" wide. Base board will be about 5" tall.

Slow But Sure

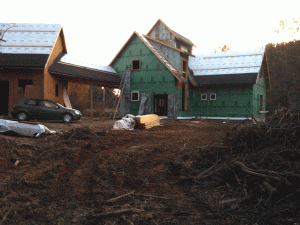
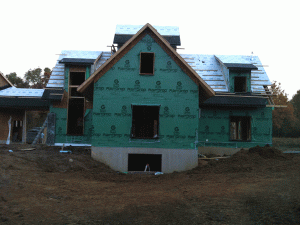
We’re slowly wrapping up the rough framing and getting ready for insulation.  I met with our EnergyStar rater and insulation contractor this week to do a walk through of the house.  It’s best to know what we need to do before the insulation and drywall start going on.  On the exterior the windows are being installed and the rigid insulation is going up.

There is some concern regarding the HVAC ducts being on exterior walls.  These days most if not all the ductwork should be on interior walls to insulation them from the exterior.  Otherwise it’s difficult to get enough insulation in those wall bays.  At least I’ll have 4″ of rigid insulation on the exterior to mitigate the issue as best we can.  Flexible ducts have been installed in many of the kneewall attic areas of our Cape Cod style home.  This means that in reality we will have to treat all these areas as conditioned space.  This will mean insulating the roof and exterior walls just like the main house, but also using some paper material to prevent air movement.  The paper material will act like drywall in terms of controlling air flow, but will be less expensive to install.  Another concern with the flexible ducts is they were installed with too many tight turns or corners.  Flexible ducts need to have gentle radius turns to keep air and debris from piling up in the corners.

A bit more on insulation.  We’ll be using blown in cellulose insulation made from recycled newspaper.  Fairly green although it is treated to be fireproof.  For air tightness we’ll be caulking the drywall seams so that should minimize any perceived ill effects of the fireproof insulation.  As far as I know it’s a safe product.  Part of the insulation job will include extensive caulking and sealing of the entire house, including around light fixtures, outlets and any wall or floor penetrations.  One place to pay attention to is between the OSB sheets.  Technically the framers should space the sheets 1/8″ apart for expansion.  They usually don’t but regardless, any visible gaps in the OSB should be sealed with spray foam from the inside.  On our house there are a couple of areas where you can see daylight shining through the green Raindrop housewrap, between the OSB wall sheathing.

We’ll be having a blower test and filling out three sets of survey forms to establish our home’s HERS rating and ultimately our EnergyStar qualification.  It’s critical that the house essentially be air tight.  I Googled it and it looks like Ohio has about 1,300 EnergyStar homes so we’ll be in the vast minority.  Hopefully in a few years this will be the norm.

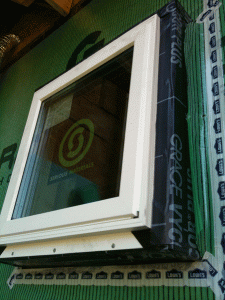
On the exterior we continue to pick away at sealing everything and installing the blue rigid insulation.  Windows are starting to go in.  We seat the aluminum nailing flanges of each window in a bead of silicone sealant / caulk and level / nail the windows in place.  Over the top of the flanges, just like our REMOTE wall article says to do, we cover with Grace Vycor Plus membrane flashing.  The insulation contractor will seal everything up from the inside with spray foam and caulk where necessary.

The windows show up with a breather tube and mylar expansion bag.  Serious windows do this because all the windows are gas-filled. Without the tubes the windows would explode when they’re driven over the Rocky Mountains.  Without the mylar balloon the gas would escape.  One of the balloons did get cut so I suspect we’ll have to have a tech come out and refill that window.  On all the other windows, I’ve been crimping the tube in two places and will cut off the mylar balloon.  I then hit the end of the tube with silicone caulk and then tuck it into the window frame.  The gas should stay in the windows for 100 years.  Definitely not my problem then.

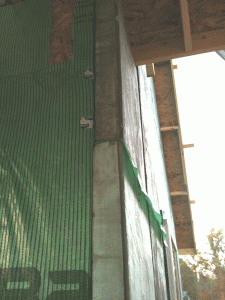
On the exterior we’re installing aluminum termite shield to protect the bottom of the rigid from ant / bug infestation.  We simply bought some white aluminum sheet metal and bent it up to form an “L” with a little lip for water run off.  The termite shield gets tacked up behind the housewrap at the bottom of the exterior walls.  It overlaps the foundation by about 2-3 inches.  Resting on top of the termite shield and housewrap are our 2×8 foot  x 4 inch thick sheets of Dow blue rigid insulation.  The rigid is installed by tacking the panel with a couple of screws.  We then come back through and put 1×3 firring strips over the vertical seams.  The horizontal seams get a one foot strip of Raindrop; it’s zig zagged with 4″ stapled above the panel against the existing housewrap, then 4″ runs across the top of the insulation panel, and finally the last 4″ flaps down over the top of the panel.  If our panels weren’t so dirty we’d just tape all the seams.  The firring strips will help give us a decent seal as will the housewrap strips.  We use 8″ screws to secure the firring strips to the wall (passing through the rigid insulation).  Try to hit studs with every screw.  Otherwise the screw will act as a conduit for cold or heat.  We missed a ton and technically should back out the screws and try again, but it’s painfully slow already so we’ll snip the exposes screws and I’ll kit them with some foam insulation.  Should be alright, even for Ohio.

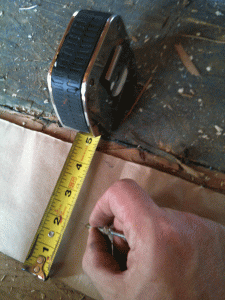
One interesting thing I came up with this week, the loft window is showing up late but we need to get the blue board in place ahead of time.  Once the blueboard is in I won’t be able to get the membrane flashing in place.  So I took strips of it and left the backer paper on and stuck the rest to the window buck perimeter.  After the window is in they can remove the paper and stick it over the flanges.

Here are some new pics from the last few days.


blue foam with housewrap horizontal "z" at joint


detail of housewrap "z" at horizontal joints of rigid insulation.


column pads for porches are finally poured. sono tubes shifted so much, threaded bolts are barely in pad. Bad workers, bad.


to remove just the backer paper from half a strip of Vycor membrane flashing, I use a common nail.


I remove half the backer paper so I can stick the strip around window buck. Once back ordered window is in I can stick the rest. In the meantime I don't hold up blue foam installation.


termite shield


window breather tube and balloon


Making Progress

Yay, we have cement in our basement!

We finished placing down the 4″ rigid insulation last night.  Also we installed our 2×4 thermal breaks in the foam pockets I’d previously cut out of our Superior Wall bays. As an added measure I also sprayed some expanding foam in the gaps between the 2×4’s and the blue foam in the walls.  I also sprayed around the base of the steel columns and any other misc. places I could see.   I didn’t go completely nuts with the spray foam but the little bit I did should help.  There were some gaps in the our insulation here and there but I doubt any of it will add up to anything meaningful. Afterall we’re dealing with constant temperature earth, then rigid and then 4″ of cement.  On top of that eventually is any furnishings like carpet, drywall, etc. plus more wall insulation.  The basement should be fine and toasty, or cool depending on the time of year.

I’ll share some photos from the day with you….

Here are the pressure treated 2x4's in the pockets I cut out of the foam walls. I used liquid nails to adhere the 2x4's. You can see how nicely everything is lining up on our level lines on the studs. 4" gravel, 4" foam, then 4" cement.

I ran out of daylight last night so I woke up and was the first person in line at Lowe’s to get some more spray foam.  I scampered out to the site and the cement contractor and pump truck were already set up by 7:30am.  I snuck downstairs and sprayed a few last-minute spots while they laid down the rebar on top of my rigid insulation.


Rough plumbing for the bathroom. We had to move the horizontal pipe up 4" after this picture so it'd clear the foam and cement. I'm not sure these pipes are all in the right place....probably something I should've checked before they poured the basement this morning.

Morning in Lowes parking lot. Mmmmm...pretty. Now back to work

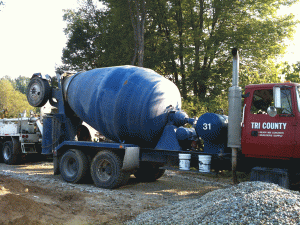
Because our lot isn’t back filled yet and the general difficulty in getting to the main house, we had to employ a pump truck to pour the basement floor.  It was pretty neat to see.  I cement truck basically backs up to the pump truck and dumps the cement in to a hopper.   The pump truck then out reaches its long boom and pumps the cement into the basement through the stairwell.  The boom is operated via remote control.  We ended up needing two trucks worth of cement to do our basement.
 

Here's a good view of the job site with the pump truck and cement truck getting ready to pump cement into the basement.


The boom is controlled via remote control by the operator, standing to the left in this picture.

The floor was poured in about 1-2 hours.  By 10:30am they were finishing off the top surface of the cement and using a trowel to cut the expansion joints in the cement floor.  The cement flowed into the bays of the foundation walls, locking everything together like a giant jigsaw puzzle.  Will be interesting to see what kind of cracking develops in the floor over time as the house settles.

Christine brought the boys out to see the cement truck and pump truck. I thought the trucks were pretty neat to see up close too.


Picture of the poured basement. Very cool indeed. Starting to look and feel like a house. Eventually somewhere in there we'll have a play room, storage room, bath and maybe even a home theater with tiered seating.

Now that the foam is down and floor is poured, my work out at the site pretty much revolves around keeping things clean and orderly.  I took out two new shiny trash cans.  One for trash and the other for recyclables.  Eventually we’ll probably get one of those large dumpsters for construction waste.  I’ve got a call into a supplier that rents them and claims to recycle up to 80% of the contents.  In the meantime I’ve started separating our construction waste and setting it off to the side.  I’ve got  a lot of foam cut offs that I need to figure out what to do with.  Hopefully they can be recycled, if not they may end up being landfilled or maybe I can use them up in my studio floor.
 

We picked up these nice Rubbermaid cans at Home Depot or Lowes (I didn't actually go to buy them, the in-laws did, I just hauled them out to the site). They both fit in the VW. Not sure if anyone will use them but they make me feel better; at least I'm trying..

 
 The excavator starts back filling this weekend and we’ll be ready to go when the framers come back to start framing the first floor.  Then ProjectCam will really have something to take pictures of and the house will start taking shape 


I started separating the construction waste as well as storing the various building materials off to the side. Backfilling starts soon so I want to make sure things are organized.

Behind the Scenes

Not much has happened in the last two days.  At least not anything that visually looks much different from day-to-day.  The first floor deck is finished.  My apologies, no photos of the progress tonight.  We did visit the site to show a friend around the site, but did not snap any pictures.  I also shirked my duties by not installing my wooden thermal breaks in the basement walls.  That’s why god invented weekends I always say.  We’ve got a couple of days before they pour the basement floor and they still have to level out the stone in the basement, so I’ve got some time.  We did get the post pads poured today which means tomorrow they can set the steel support posts for our steel I-beam and the LVL that supports the master bedroom suite.

It was a busy day behind the scenes so to speak though, as nearly every day is.  I ordered the windows.  There’s a pretty hefty lead time and in reality I could have ordered them a few weeks ago because it sounds like the rough framers will blow through our house in about seven building days.  But we’ll be okay.  The framers can come back at a later date to install the windows.

I haven’t had much luck tracking down my Pactiv Greenguard Raindrop housewrap.  I’ve got some feelers out to a couple of resources.  We’ll have a meeting later this week with my site supervisor and architect to go over the nuances and details of constructing the non-traditional aspects of the home.  To make the house super insulated and tight there are some fundamental details we’ll need to adhere to construction-wise to assure we get the performance we want and to minimize the amount of do-overs we encounter (basically the number of times I have to pay someone to rip out something that I already paid for because it was installed incorrectly).  The hard to find housewrap is just one player in a greater team effort to make our home outperform pretty much every other home (relatively speaking) in northern Ohio.  I will now be in the rarefied air where I can get into thermal performance arguments with friends and family who have log homes.  Yes, I know it sounds dangerous, but trust me ladies (and gents), my house will be able to hold its own in said arguments.

Here’s a wall section of our version of a “passive solar house”:

Typical wall section for our high-efficiency house. Courtesy of Ferut Architects in Vermillion, Ohio.
You can see we’re using 2×6 studs and 4″ of rigid insulation on the outside.  That will give us 10″ walls with really deep interior window sills.  The cat will love us for that.  There are essentially 3 locations we could’ve place the window in the wall section.  We chose the outward most to give us the most window sill inside and the most conventional look on the outside.  The other two options would be smack dab in the middle or even inboard, framed in the stick walls in a traditional manner.  With our way we’ll have to build large wood “bucks” around each window.  It’s kind of a pain but it will give us the look and performance we desire.
 
The Greenguard Raindrop goes on top of the plywood sheathing.  We didn’t go with the triple pane windows to save costs but the windows we chose will outperform pretty much all name brand double pane windows.  We did not get the hard-core German import windows.  I went to the City Club once where they were talking about windows for passive solar houses and they said the only windows you should use are from Germany.  I think that’s a little crazy.  My windows are from like Wisconsin or California I think.  I guess I won’t be privy to the secret German window handshake, gang sign and tattoo, but I’ll still be plenty cozy in wintertime.  At some point I’ve got to divert funds to my overpriced fridge and range.  I mean come on cold wine and well cooked tenderloin count for something in this day and age.  Sorry German windows.  Maybe next house.
 
Speaking of passive solar, our house is oriented about due south.  We’re off by a few degrees if for no reason than to be outliers at the “Passive Solar and Plush Kitten Convention” (I made that up).  Seriously though, the house just sits better on the land this way and it won’t affect our performance that much.  Also it gives us a nicer orientation for when I place photovoltaics on the garage roof.  You typically want those facing south (in the northern hemisphere). On the main house we’ll have really big windows and the roof will overhang enough in the Summer to keep the sun out, but short enough to let it flow inside in the Winter.  No we don’t have massive cement floors or walls to absorb heat and store it overnight for late nite Deutsche swinger parties.  Though we will have some dark tile and cement countertops in the kitchen, so that’s gotta count for something…right? 
 
“Dies ist keine passive solar.” 
 
“Meh, grab me a Burning River from my overpriced fridge and sit your German butt down on my ski lift chair.  If you’re nice I’ll tell you my goat wrestling story.”
 
There will be some details like wrapping the top plates and making sure everything is sealed up tight that we’ll have to work through the differences compared to normal construction.  Hopefully over time what we’re doing will become “normal” construction.  But for now most of what we’re doing goes against what the traditional model the home construction industry and supply network has been founded on for the last 70 years.  I’ve found that to be the biggest challenge.  Right now, in 2011, we are kinda stuck in a transition period.  There are great designs, solutions and products but many of them are either expensive, difficult to find or the techniques to implement them aren’t fully developed or understood.  Working against that is misunderstanding, need for education, or worst case: resistance to change. Additionally, our forms of measurement of success are based on how things have always been done in the past.  There are a lot of old models that need an “extreme home makeover” (all rights reserved, American Broadcasting Company) so to speak.  Also even the green building industry doesn’t always think holistically, that is to say how does my product work with other products that I may not be trying to sell you? As a consumer, being willing to research and sometimes pay more isn’t always enough.  There’s still a lot of luck and praying involved….and mistakes to be made.   When in doubt, cave into conventional ways of thinking and let the next generation sort it out……(just kidding….though there was that one mahogany beam I was going to use in my closet…..)
 
I think we’re doing a relatively good job all things considered.  My current windmill I’m chasing is how to handle construction waste.  I need to get some garbage cans out there (by the way, why don’t have a vehicle able to haul large items?  I need a pick up truck desperately) for recycling and trash.  We’ll get a huge dumpster eventually.  I ran out of time and energy to go hard-core and separate everything and forego the dumpster. 
 
I guess that’s it for now.  A few more days of misc. stuff and then the framing will commence full steam ahead.

Gimmie a Break

Busy day, but not on the job site.  Sorry ProjectCam, I promise I’ll be out to check on you soon.  Poor little guy, probably figured I’d abandoned him.  I’ll bring a cloth to wipe off your lens and I’ll check to make sure you’re still running.

I haven’t shared much about the house design yet.  We hired a local architect, Joe Ferut, to design our home.  I’ll tell you more about Joe in the future, and the advantages of working with an architect as well.  Here’s a pic of the front of the house:

Front elevation of the house.

I call it a contemporary farm-house.  The goal is to mimic the concept of an old farm-house or mill, kind of New England-y (made that up).  Historically it should fit in with the Western Reserve architecture of the area, or at least in my mind it does and guess what, I’m paying the bills around here so what I say is the god’s honest truth.  No questioning my immense knowledge on this or any other topic for that matter.  But I digress.  I’ll tell you more about the house style in a later post.

One of the reason’s we wanted an architect was to implement some environmentally sustainable concepts / practices into our new home.  The plan is to live there for a long time and I absolutely hate writing checks each month to utility companies.  Some people enjoy it and I’d never begrudge them for that relationship they have.  I guess I’ve just got an independent streak.  Also I’m willing to spend more up front and reap the rewards long-term. 

Full disclosure, I don’t purposefully make stuff up but I’m no expert, double-check your facts before you attempt this at home.  I’m going to spout off a bunch of stuff that I probably have no intellectual right to spout off on, but this is the internet so….I pretty much have the free reign to act smart with virtually no ramifications.  Here we go, a lesson on thermal breaks (as they exist in my mind).

I can get more into tactics in the future, but to simplify it  we basically want to keep the cold air out and warm air in the Winter and vice versa in the Summer.  We’ll have a super tight house to prevent air transmission from in and out (unless we want it to via an open window).  Even then though heat or cold can penetrate the walls so we will employ “thermal breaks” to make it tougher for all those nasty cold air molecules to “pass through” (actually I think they rub each other but we’ll keep it clean here…..) our walls.  The thermal breaks, as far as I can tell act as speed bumps or roadblocks.  Usually they’re a dissimilar material sandwiched between to other materials.  Like air between two panes of glass.  Or insulation in your wall between the inside drywall and the oriented strand board on the outside. 

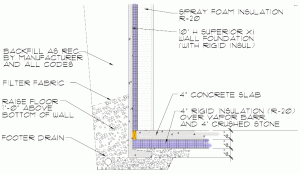
Today my crack team of designers, builders and random homeless people off the street tackled the design of the thermal break in my basement floor.  I know throw in some candle light and we’ve got the making of one of those trashy romance novels, but really it’s not as romantic as it sounds in this blog.  Here’s a pic:

Basement thermal break detail. Can you spot it?

We need to separate the cold outside concrete, stone and earth, from the warm inside concrete, insulation and air.  The Superior Wall system we’re using has its own break in the form of integrated foam built into the wall (colored blue in the pic above).  I’ll tell you more about Superior in a future episode but take a look at ‘Extreme Home Makeover’ on ABC on any given 2011 Sunday to see their handy work first hand.

 
Back to the break.  Yours truly gets to lay down 4″ of blue foam on top of the gravel in my basement.  Voila!  Thermal break, oh heck yeah.  I colored it blue (periwinkle) in the pic as well.  I’m an artist, don’t try this at home.
 
That just leaves the nasty connection between the concrete floor and the concrete on the Superior Wall.  I can’t run foam between the two because the concrete floor is going to lock the bottom of the wall system in place.  If it was just foam the walls would squish the foam in an effort to meet up (mate?) with the concrete floor.  Then I’d have to listen to blue foam dying in my basement for the rest of my life.  Instead I’m going to separate the two pieces of concrete (wall and floor) with a thermal break made out of, you guessed it, a different material.  In this case pressure treated wood.  That should slow down or stop the cold air molecules, camping out in the dirt, from getting into my house. 
 
If you want to get more technical than that read a book or talk to an expert, but I guarantee they won’t be as much fun as me, go off on any tangents, nor will their beer be nearly as cool and refreshing as my thermally controlled beer will be, even when it’s 100 degrees outside.
 
-Chris